Style blogspot blogger date header

Posted by Unknown

To change your blog's date header color and font style, you can do it with a very simple CSS adjustment that will make the date header to float on the left side of your post and to be partially out of the structure like a banner with a colorful appearance.
See the result in the image below:


How to do it

Step 1. Login into your Blogger Dashboard, select Template option > click on Edit HTML 


Step 2. Select Expand Blogger Template and search (CTRL + F) for the following code:

date.header

Or...

.date-header

Step 3. Add the following code snippet just below of it
background:white;
border-bottom: 1px solid #000000;
font-size:12px;
margin-left:-105px;
padding:3px 3px 3px 3px;
width:90px;
word-wrap:break-word;
float:left;
}

Putting it all together, it should look something like this:

.date-header span {
background:#FFD465;
border-bottom: 2px solid #cc0000;
color:#000000;
font-size:12px;
margin-left:-105px;
padding:3px 3px 3px 3px;
width:90px;
word-wrap:break-word;
float:left;}

To modify the style, replace the above bold/colored codes...

to change the background color:
to change the border style:
  • delete -bottom if you want border all around
  • change: 2px to a higher or lower value
  • change: solid with dotted if you want a dotted line
  • change:  #cc0000 with the hex code of border color

to change the font size and date color:
  • for a bigger text, change: 12px to a higher value
  • color: replace the hex code (#000000) with the hex of date color

Example:

color: #0000cc;

to change margin-left:
(represents the distance between date and blogger post)
  • replace -105px with a bigger/smaller value
float:

  • change left to right
More aboutStyle blogspot blogger date header

Display post author, date, labels and comments with icons below post titles

Posted by Unknown

When there are no comments made to your posts, there's a link that says 'Be the First to comment!' and when there is just one comment it says '1 comment so far'. If you want to make your blog more stylish by replacing these texts with some cute small icons along with the default Author Name, Post Date, Labels and Comments... then just follow the next steps:


Steps:
 
Step 1. From your Blogger Dashboard, click on the Template option, then press the Edit HTML button:


Step 2. Select the "Expand widgets templates" box


Step 3. Search for the below code (press the CTRL + F keys and paste the code in the search box):


<div class='post-header-line-1'>

If you can't find the code above, look for this one:

    <div class='post-header'>

Step 4. Paste the following code below/after the code above:

<font style='background:transparent url(https://blogger.googleusercontent.com/img/b/R29vZ2xl/AVvXsEi8J0dpK_J8q86NDuI-YsvsA7zC6rKZO4P3_afdDNNB2nh0nlTBoRUGrDf-SiNL3peWwhhfHkpSPI11_q2OgbwjjXV3aWvksgOme05EvXM30tnYJOJHLmw3PSHk1RhgVHK1qgOaXyZpNClD/s1600/author.gif) no-repeat scroll top left;padding-left:25px;font-size:11px;'><data:post.author/></font> | <font style='background:transparent url(https://blogger.googleusercontent.com/img/b/R29vZ2xl/AVvXsEj9xklFs37gyVKS0b5xKkm8804baFI1goTlD102WkPmbODlFb1dtWr6fIMceSTVJgNHOjuTXh2_tc2WYTUrGa7XE6GzkaDfbZ4uOMeq9QAexNlTav8Okl0hJQnFU2VPhR78_3uYTHlwODWE/s1600/clock_icon.gif) no-repeat scroll top left;padding-left:25px;font-size:11px;'><data:post.timestamp/></font> | <font style='background:transparent url(https://blogger.googleusercontent.com/img/b/R29vZ2xl/AVvXsEjRc6KvJnSPiU-Ds4Ie-SwSVRFSEKlXgWKD9fUFByIYRaQdjsobJhC98GytZlIhV8FMrVLSyKM4Et1OAmRx88D3j3e7CyzZ9qdn5igx9FR0FcmUNNis2BUoR0MPEq56Y11OfwbKUtU1FAcV/s1600/tag+icon.gif) no-repeat scroll top left;padding-left:25px;font-size:11px;'><b:if cond='data:post.labels'>
<b:loop values='data:post.labels' var='label'>
<a expr:href='data:label.url + &quot;?max-results=8&quot;' rel='tag'><data:label.name/></a>
<b:if cond='data:label.isLast != &quot;true&quot;'>|</b:if>
</b:loop>
</b:if></font>
<span class='post-comment-link' style='Float:right;'>
        <b:if cond='data:blog.pageType != &quot;item&quot;'>
          <b:if cond='data:post.allowComments'>
            <a class='comment-link' expr:href='data:post.addCommentUrl' expr:onclick='data:post.addCommentOnclick' style='background:url(https://blogger.googleusercontent.com/img/b/R29vZ2xl/AVvXsEja9H4Ncuw_c6iDQsXb9TBuKhwF13ZQFPZqOfPItX-jyc7tJo43Az68cOmAWfR953LqRKi_TxWg6AQe_mjrGYh6RRa6AUO_LTdowaC6lXp6BWMqqAO0nRnKeJ0Kvk2-lB4EU4LxPpWTo1wa/s1600/comment-icon.png) no-repeat;Padding-left:20px;'><b:if cond='data:post.numComments == 0'>Be the first to comment!<b:else/> <b:if cond='data:post.numComments == 1'><data:post.numComments/> Comment so far<b:else/><data:post.numComments/> Comments so far</b:if> </b:if></a>
          </b:if>
        </b:if>
      </span>

How to customize:

If you want to change the icons, just replace the URL addresses above colored with:

  • Red - Author
  • Green - Date
  • Blue - Labels
  • Violet - Comment bubble

... with the URL address of your image.

Step 5. Save template... and you're done!
More aboutDisplay post author, date, labels and comments with icons below post titles

How to remove/delete labels from Blogger posts

Posted by Unknown


Many bloggers might find labels below posts (or post titles) unnecessary, as long as they are already in the blog's sidebar. In this tutorial we will learn how to remove them manually. To hide labels from the blogger post footer (or below post title), you could simply uncheck the "Labels" option, however, sometimes this setting might not work properly in certain templates and then we'll have to remove it manually from our template.

How we going do this?

Hide labels from Blogger

Step 1. Click on the 'Template' option and then go to the 'Edit HTML' button.

hide labels, blogger labels, blogger tutorials

To ensure that you won't lose or delete something, it is advisable to make a backup of your current template. To do this, click on the Backup/Restore button on the right top corner:

blogger labels, blogspot tricks
 ...and then click on the Download full template button:


Step 2. After you clicked on the Edit HTML button, select the 'Expand Widget Templates' option for expanding the CSS code.

Step 3. Now find the following code snippet (press CTRL+F and paste the code in the search box):
<b:if cond='data:post.labels'>
          <data:postLabelsLabel/>
          <b:loop values='data:post.labels' var='label'>
            <a expr:href='data:label.url' rel='tag'><data:label.name/></a><b:if cond='data:label.isLast != &quot;true&quot;'>,</b:if>
          </b:loop>
        </b:if>

Step 4. And delete it.

Step 5. Click on the Save Template button. You're done ;)
More aboutHow to remove/delete labels from Blogger posts

How To Remove Blogger Navbar

Posted by Unknown

WHAT IS BLOGGER NAVBAR?
Blogger has got a Navigation Bar that appears by default at the top of every Blogger-powered blog. This navigation bar can be very useful when you are blogging, but sometimes, it can get in the way. The Blogger navbar is usually hidden in most of the third party templates.

The advantages of it are the following:

- when you click on the B icon, it will take you to blogger.com
- a quick link to your Dashboard and "Sign in /Sign out" dialog
- you can easily search for other blogs
- you can "Flag Blog" (if you consider content of a blog objectionable)
- NextBlog - takes you to a random, recently-updated Blogger blog

The only disadvantage is visual. If you have customized design, Navbar just doesn't fit in.

So how we get rid of it? It is very simple. Just follow the next steps...

Removing The Blogger Navbar:

1. Login to your Blogger account, click on your blog name and navigate to Layout;

2. Look for the Navbar text and click on the Edit link as shown in the picture below:

blogger navigation bar, blogspot tricks

3. When the pop-up window appears, scroll down and select Off, then click on Save button:

blogger navbar, navigation bar, blogger

You're done.
More aboutHow To Remove Blogger Navbar

Facebook jQuery POP OUT likebox widget generator

Posted by Unknown

facebook likebox widget
I had developed a Facebook Static popout jquery effect Like box generator for you.This Widget Generator let's you easily generaate your favorite Facebook style Widget and also easily add to your Blogger Blog.In my previous Article (How to Add a Static Facebook jQuery Pop out Widget) I told you about Static Facebook POP OUT Widget installation manually.Use this Widget generator and Enjoy..!


Step 1: Add jQuery plugin (if your blog have a jquery plugin,ignore this step)
  • Go to Design->Edit HTML[Template->Edit HTML in new blogger interface]
  • Copy below code inside <head>
<script src='http://ajax.googleapis.com/ajax/libs/jquery/1.7.1/jquery.min.js' type='text/javascript'/>
  • Go to Design-> Page Elements
  • Click add gadget and select HTML/javascript
  • Copy and paste the generated code inside it and save it.


This is my first widget generator,also expect more other awesome widget generators from us.If you enjoyed this widget Generator please please share n like us..
More aboutFacebook jQuery POP OUT likebox widget generator

Dynamic Views Button with jquery Effect for Blogger Blog

Posted by Unknown

Here is a Simple Tip to Set a Button for Changing the Blog View to Dynamic Views.I added Smooth jquery Hover Effect to Button.You can set any template to your Blogger Blog.If you add this Button to your Blog.It lets your Blog visitors to View Blog in Dynamic Views when they Click this Button.


Add Dynamic Views Button to Blog

Make sure you had Backed up your Template before editing Template.(How to Backup Template)

  • Go to Design -> Edit HTML
Step 1.Add jQuery Plugin( If your Blog already have a jQuery plugin ignore this Step ),
    • Go to Design->Edit HTML
    • Copy and Paste Below code inside <head> section
      <script src="https://ajax.googleapis.com/ajax/libs/jquery/1.7.1/jquery.min.js"></script>
    Step 2: Add Dynamic view button,
    •  Go to Design-> Page Elements
    • Click on Add Gadget ,Select HTML/Javascript from it
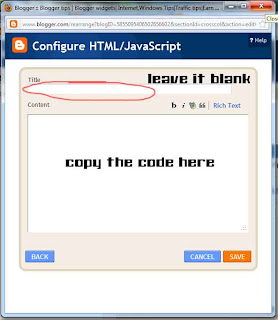
    • Leave Title as blank, Copy the below code inside content section.

      <div class="noopdynamic">
      Click this for change the view to Dynamic views</div>
      <a href="/view">
      <img class="noopdynamicimg" src="https://blogger.googleusercontent.com/img/b/R29vZ2xl/AVvXsEjQuJXXHqxAPcXvS3nwVblPKrK2pDt9kHztB_aF7ouo76ZEEkBiXcTepEouuE6GZcETyCrGoYbIFLx-djfPdg0U5uzJh9S5lUbglth0ff_bSIZ7DUcUgrTizIoHtX97KhLWrSCzoY06w0U/s1600/google+dynamic+views.jpg" /></a>
          <style type="text/css">
          .noopdynamicimg{bottom: 2%;
              position: fixed;
              right: 1%;}
              .noopdynamic {background: -moz-linear-gradient(top, #aebcbf 0%, #6e7774 50%, #0a0e0a 51%, #0a0809 100%); background: -webkit-linear-gradient(top, #aebcbf 0%, #6e7774 50%, #0a0e0a 51%, #0a0809 100%);
              background-color:#ABABAB;
              border: 2px solid;
              border-radius: 6px 6px 6px 6px;
              bottom: 13%;
              padding: 4px;z-index:999;
              position: fixed;
              right: 5%;
              font:18px Arial;
              text-shadow: 1px 1px 0 #FFFFFF;
              width: 21%;
              box-shadow:0 0 5px;
          }

          </style>

      <script type="text/javascript">
      $(function(){
          $(".noopdynamic").hide(0);
      $(".noopdynamicimg").hover(function(){
          $(".noopdynamic").show("slow");
      },function(){$(".noopdynamic").hide("medium");
      });});
      </script>
      • Then Save it.
      • That's all,you are done..
      I hope you enjoyed this article,if so please share n like us.
      More aboutDynamic Views Button with jquery Effect for Blogger Blog

      Stylish Static animated Flash Clock for Blogger

      Posted by Unknown

      stylish clock blogger
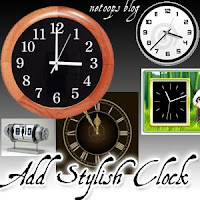
      Here I am saying about How to Add a Stylish Flash Animated Clock to your Blogger Blog.Here is a huge collection of Clock widgets for your taste.Follow the Simple Steps below to make your Blog Stylish,Cool, and Smart looking Blog.


      • First of all SignIn to your Blogger Account 
      • Select Design->Page Elements
      • Click on Add Gadget
      • Select HTML/javascript from it,then copy the code of clock you want.
       

        Step 1: If you want a NON Static Clock Widget,then Just copy and paste the code to HTML/javascript content.

        If you want a cool static clock,then first do the step above and Click HERE

        Add Stylish Flash Clock 1


        • If you want to add this Clock,then Copy  and paste the below code
        <div class="noop-clock"><center><embed height="140" src="http://www.hitarek.com/clock/clock24-6.swf?TimeZone=IST&amp;Place=&amp;" type="application/x-shockwave-flash" width="210"></embed></center><center><a style="font-size: 3mm" target="_blank" href="http://www.hitarek.com">Free Clock</a></center></div>

        Add Stylish Flash Clock 2


        • If you want to add this Clock,then Copy  and paste the below code
        <div class="noop-clock"><center><!-- hitarek.com --><embed width="210" src="http://www.hitarek.com/clock/clock24-2.swf?TimeZone=IST&Place=&" height="140"  type="application/x-shockwave-flash"></embed></center><center><a style="font-size: 3mm" target="_blank" href="http://www.hitarek.com">Free Clock</a></center></div>

        Add Stylish Flash Clock 3


        • If you want to add this Clock,then Copy  and paste the below code
        <div class="noop-clock"><center><!-- hitarek.com --><embed width="120" src="http://www.hitarek.com/clock/clock5-1.swf?TimeZone=IST&Place=&" height="230" wmode="transparent" type="application/x-shockwave-flash"></embed></center><center><a style="font-size: 3mm" target="_blank" href="http://www.hitarek.com">Free Clock</a></center></div>

        Add Stylish Flash Clock4


        • If you want to add this Clock,then Copy  and paste the below code
        <div class="noop-clock"><center><embed height="230" src="http://www.hitarek.com/clock/clock5-2.swf?TimeZone=IST&amp;Place=&amp;" type="application/x-shockwave-flash" width="120" wmode="transparent"></embed></center><center><a style="font-size: 3mm" target="_blank" href="http://www.hitarek.com">Free Clock</a></center></div>

        Add Stylish Flash Clock4


        • If you want to add this Clock,then Copy  and paste the below code
        <div class="noop-clock">
        <center><iframe allowtransparency="true" frameborder="0" height="148" hspace="0" marginheight="0" marginwidth="0" scrolling="no" src="http://www.hitarek.com/animation/dolls5.html" vspace="0" width="100"></iframe></center><center><a href="http://fe-blogger.blogspot.com/" style="font-size: 2mm;" target="_blank">FreeWidgets</a></center></div><center><a style="font-size: 3mm" target="_blank" href="http://www.hitarek.com">Free Clock</a></center>


        Add Stylish Flash Clock5


        • If you want to add this Clock,then Copy  and paste the below code
        <div class="noop-clock">
        <center><!-- hitarek.com --><embed width="130" src="http://www.hitarek.com/clock/clock11-4.swf?TimeZone=IST&Place=&" height="130" wmode="transparent" type="application/x-shockwave-flash"></embed></center><center><a style="font-size: 3mm" target="_blank" href="http://www.hitarek.com">Free Clock</a></center></div>

        Add Stylish Flash Clock6


        • If you want to add this Clock,then Copy  and paste the below code
        <div class="noop-clock">
        <center><!-- hitarek.com --><embed width="160" src="http://www.hitarek.com/clock/clock25-9.swf?TimeZone=IST&Place=&" height="160" wmode="transparent" type="application/x-shockwave-flash"></embed></center><center><a style="font-size: 3mm" target="_blank" href="http://www.hitarek.com">Free Clock</a></center>

        </div>

        Add Stylish Flash Clock#


        • If you want to add this Clock,then Copy  and paste the below code
        <div class="noop-clock">
        <center><!-- hitarek.com --><embed width="140" src="http://www.hitarek.com/clock/clock22-5.swf?TimeZone=IST&Place=&" height="180"  type="application/x-shockwave-flash"></embed></center><center><a style="font-size: 3mm" target="_blank" href="http://www.hitarek.com">Free Clock</a></center>
        </div>

        Add Stylish Flash Clock 7


        • If you want to add this Clock,then Copy  and paste the below code
        <div class="noop-clock">
        <object><param name="movie" value="http://flash-clocks.com/free-flash-clocks-for-websites/free-flash-clock-24.swf"><embed src="http://flash-clocks.com/free-flash-clocks-for-websites/free-flash-clock-24.swf" width="150" height="150" wmode="transparent"> </embed></object>
        </div>

        Add Stylish Flash Clock 8


        • If you want to add this Clock,then Copy  and paste the below code
        <div class="noop-clock">
        <object><param name="movie" value="http://flash-clocks.com/free-flash-clocks-for-websites/free-flash-clock-15.swf"><embed src="http://flash-clocks.com/free-flash-clocks-for-websites/free-flash-clock-15.swf" width="150" height="150" wmode="transparent"> </embed></object>
        </div>

        Add Stylish Flash Clock 9


        • If you want to add this Clock,then Copy  and paste the below code
        <div class="noop-clock">
        <embed src=http://flash-clocks.com/free-flash-clocks-blog-topics/free-flash-clock-175.swf width=200 height=200 wmode=transparent type=application/x-shockwave-flash></embed>
        </div>

        Add Stylish Flash Clock 10


        • If you want to add this Clock,then Copy  and paste the below code
        <div class="noop-clock">
        <embed src=http://flash-clocks.com/free-flash-clocks-blog-topics/free-flash-clock-150.swf width=200 height=200 wmode=transparent type=application/x-shockwave-flash></embed>
        </div>

        Add Stylish Flash Clock@


        • If you want to add this Clock,then Copy  and paste the below code
        <div class="noop-clock">
        <object><param name="movie" value="http://flash-clocks.com/free-flash-clocks-for-websites/free-flash-clock-63.swf"><embed src="http://flash-clocks.com/free-flash-clocks-for-websites/free-flash-clock-63.swf" width="150" height="150" wmode="transparent"> </embed></object>
        </div>


        Add a Static Clock

        Step 2:
        • Copy and Paste the CSS code below after the code of clock.
        <style type="text/css">.noop-clock {
        position: fixed;
        right: 0%;
        top: 0%;
        padding: 3px 7px;
        box-shadow: -2px 2px 6px;

        }</style>
        •  Then click on Save.
        With this tutorial you have got a Beautiful Clock.
        If you feel any confusion or doubt then please do comment.
        More aboutStylish Static animated Flash Clock for Blogger

        Google’s New Privacy Policy - What does it mean to you?

        Posted by Unknown

        Recently Google unveiled its new privacy policy. Privacy policy and Terms & Conditions are things which no one likes to read :) . So this blog post will explain you in short and simple terms what Google’s new privacy policy is all about and how will it affect you as a user of Google’s services.

        According to Google’s new privacy policy it will centralize all your data or personal information and one service of Google can use your personal data related to another service.

        Read more »
        More aboutGoogle’s New Privacy Policy - What does it mean to you?

        Facebook Static Pop Out Like Box with jQuery Effect for Blogger

        Posted by Unknown

        facebook pop out likebox
         Here is a Tutorial about how to add a static Pop out Like Box with Cool jQuery hover effect.This a Awesome Blogger Blog Widget that adds a little beauty to your blog.

        After installing this Widget a Facebook Logo will appear on the right side of your Blog.When you Mouse over that Logo it Pop out with Smooth jQuery Effect.

        Follow the instructions for installing this Widget.


        If you don't interested in Editing HTML,you can use our WIDGET GENERATOR.

        Install Facebook Pop Out Like Box Widget

        • Go to Design-> Page Elements
        • Click on Add Gadget
        page elements blogger
        • Select HTML/Javascript from it
        • Leave title as blank ,Copy and Paste the below code into the content section.

        <script type="text/javascript">
        /*<![CDATA[*/
        jQuery(document).ready(function() {jQuery(".noopslikebox").hover(function() {jQuery(this).stop().animate({right: "0"}, "medium");}, function() {jQuery(this).stop().animate({right: "-250"}, "medium");}, 500);});
        /*]]>*/
        </script>
        <style type="text/css">
        .noopslikebox{background: url("https://blogger.googleusercontent.com/img/b/R29vZ2xl/AVvXsEj7T4UJ-8Dhys7DcHRaN6nht4JoZqDiNzr57kZmrfPo24u73tc0dFSoP3UFTyDIWUeJHo4O2ttKgu-9g5ixAzVPONur4VgpA3WKZUC-BJsbzX1uaR56ayzl1ZkoWA1kIx0e-py3EEshum8/s1600/fb_static+button.jpg") no-repeat scroll left center transparent !important;display: block;float: right;height: 270px;padding: 0 5px 0 46px;width: 245px;z-index: 999;position:fixed;right:-250px;top:20%;}
        .noopslikebox div{border:none;position:relative;display:block;}
        .noopslikebox span{bottom: 12px;font: 8px "lucida grande",tahoma,verdana,arial,sans-serif;position: absolute;right: 7px;text-align: right;z-index: 999;}
        .noopslikebox span a{color: gray;text-decoration:none;}
        .noopslikebox span a:hover{text-decoration:underline;}
        </style>
        <div class="noopslikebox">
            <div>
            <iframe src="http://www.facebook.com/plugins/likebox.php?href=http://www.facebook.com/pages/NetOops-Blog/159796530791611&amp;width=245&amp;colorscheme=light&amp;show_faces=true&amp;connections=9&amp;stream=false&amp;header=false&amp;height=270" scrolling="no" frameborder="0" scrolling="no" style="border: medium none; overflow: hidden; height: 270px; width: 245px;background:#fff;"></iframe>
            </div>
        </div>
        • Replace the RED highlighted text with your Facebook page URL.
        I hope you'd liked this Article,if so please share, like this. 
        More aboutFacebook Static Pop Out Like Box with jQuery Effect for Blogger

        Convert Blog Posts to PDF file in Blogger Blog

        Posted by Unknown

        pdf blog post
        Here is a post that helps you to easily convert the Blog posts/Blog/Website to a Pdf file.So you can easily refer that Blog Post without the connection of Internet.

        Follow the Instructions Below


        How to convert Blog post to PDF

        •  Then Click the button P on the left side
        • That's all.You will get the PDF file.

        Get PDF file of Blog post in this Blog.

        • Simply open the Blog post you want to Convert.
        • At the end of post there are some sharing buttons (Please share via Facebook,Twitter,etc) ,you will see an icon  P that like you found on the http://pdfmyurl.com,(Shown in below Fig.)  Click it
        blog post to pdf

        • You will get the PDF file of that post.
        I hope you had enjoyed this post....Please Share this
          More aboutConvert Blog Posts to PDF file in Blogger Blog