How to Burn Blogger RSS Feeds at Feedburner

Posted by Unknown

What is RSS?

A RSS (Really Simple Syndication) feed is a XML-based format for your content. Most blogging platforms, for example, will have an RSS feed built in. Whenever you start publishing posts, your latest posts will be updated in the RSS feed. Visitors to your website can subscribe to your blog’s RSS feed in an RSS reader such as Google Reader.

What is FeedBurner?
Most blogs have RSS feed which is detected automatically by commonly used feed readers when the blog URL is added to the reader.

However, if you want to make it more obvious and easier for readers to subscribe using RSS, or want to know exactly how many people subscribe to your blog then the best option is to add a Feedburner RSS feed and email subscription to your blog.

Feedburner is a free web service which enhances bloggers and podcasters ability to manage their RSS feeds and track usage of their subscribers.


How to create a feed with feedburner

1. Go to Feedburner and sign in to Feedburner with your Google Account (create a Google Account first if you don’t have one).

2. To set up your RSS feed with Feedburner, simply copy the URL of your RSS feed and paste it into the “Burn a feed right this instant” box. Then click Next >>


3. On the next screen, choose the second options - RSS.


4. On the next screen you will be given your RSS feed’s new URL on Feedburner. You will want to use this URL anywhere you reference your RSS feed on your blog. Change the feed title and address with your own.


5. When you click on Next, you will be given the options to setup tracking features for your RSS feed.
Check "Clickthroughs" and "I want more!..." options.


Adding Your Feedburner Feed To Your Blog

This is used to add the RSS icon and easy subscribe options to your blog side bar using a text widget as explained below:

1. Click on the Publicize Tab > Chicklet Chooser in your Feedburner account and copy the HTML code.

2. Go to Blogger Dashboard > Design > Page Elements and add a new gadget

3. Select HTML/JavaScript from the pop-up window and paste the html code in the box.

Adding a FeedBurner Email Subscription

After you have set up your feed, you will want to consider giving visitors the option to subscribe to your content via email. If so, you will want to go to the Publicize tab and click on Email Subscriptions. Click on the Activate button to start email subscription service for your RSS feed.


You will then want to click on Communication Preferences in the left sidebar menu. This will allow you to customize the activation email subscribers receive to confirm their subscription.


Once customized, click Save. The next options you will want to configure are under Email Branding in the left sidebar menu. This is where you can upload a logo, customize the Email Subject line, and change the font styles, colors, and sizes to format the email subscribers will receive. Click Save when finished.

The last (and most important) setting for your email subscription is the Delivery Options. This is where you will tell Feedburner what time to deliver new RSS feed updates to subscribers.

Once saved, click on the Subscription Management link. Here, you can get the code to add a subscription form on your blog or you can get a link to your take visitors to the opt-in form for subscribing via email.

To add it on your blog:

1. Go to Blogger Dashboard > Design > Page Elements

2. Add a new Gadget

3. Select HTML/JavaScript & paste the code in the box.

Redirecting All Your Blog Feed To Feedburner

Unless you redirect all your blog feed to Feedburner you won’t get accurate subscriber numbers because some of your readers subscribe using your original blog feed.

To do this:

1. Go to Settings > Site Feed in your blog dashboard

2. Add your Feedburner address to Post Feed Redirect URL and click Save Changes.


3. Now all your feeds is automatically redirected through FeedBurner and you’ll be able to track subscribers.

If you are enjoying reading this blog, please consider Subscribing!
More aboutHow to Burn Blogger RSS Feeds at Feedburner

Create your own google type search engine

Posted by Unknown

create google type search engine
Here is a funny and interesting trick I am going to show you.Create a Google Type search engine with your Google type Logo.It can be done very easily..


Netoops Blog Search Engine check it
  • Go to FunnyLogo
  • Select the logo type (eg: Google type,Yahoo type,Harry potter type)
Enjoy.......!Have a nice Day...
    More aboutCreate your own google type search engine

    Add Facebook Like Button Below Post Titles

    Posted by Unknown

    facebook like button, blogger tricks

    This Facebook Like button allow users to Like your post and share it to their Facebook friends. If you want to add the Facebook Like Button below your blogger post title, then follow these steps:

    Adding Facebook Like Button Below Post Titles

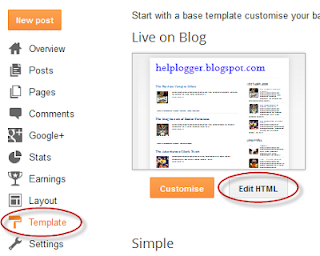
    Step 1. Go To Blogger Dashboard > Template > Edit HTML (click on Proceed if needed)

    Screenshot 
    facebook for blogger, facebook button

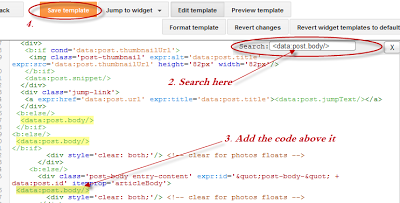
    Step 2. Click anywhere inside the code area and search - using CTRL + F keys - for this piece of code:
    <data:post.body/>
    Note: you might find it more than 3 times, stop to the 2nd one (or 3rd one in case it wont show up after applying the code from step 3)

    Step 3.  Just above it, paste this code:
    <p><iframe allowTransparency='true' expr:src='&quot;http://www.facebook.com/plugins/like.php?href=&quot; + data:post.url + &quot;&amp;layout=button_count&amp;show_faces=false&amp;width=100&amp; action=like&amp;font=arial&amp;colorscheme=light&quot;' frameborder='0' scrolling='no' style='border:none; overflow:hidden; width:100px; height:20px;'/></p>
    Screenshot

    facebook button

    Step 4.  Save your template and you are done!

    For any questions you may have, please leave a comment below!
    More aboutAdd Facebook Like Button Below Post Titles

    Auto Read More with thumbnail for Blogger/Blogspot Posts

    Posted by Unknown

    This hack will summarize content and show only summary in Home page, Archives Page and Label Page using Automatic Read More simple script in your template. Using automatic read more on your blog will make your blog load faster by showing few post instead of the full post on the homepage.
    Automatic read more for blogger posts can be done by inputting some code into your blog templates.

    How to install Automatic Read More Hack for Blogger

    There are two options you can choose from:

    1. Auto readmore for all the posts:

    Step 1. Find (CRTL + F) this code:

    <data:post.body/>

    Step 2. And replace with this:

    <b:if cond='data:blog.pageType != &quot;item&quot;'>
     <b:if cond='data:blog.pageType != &quot;static_page&quot;'>
      <div>
       <b:if cond='data:post.thumbnailUrl'>
        <img class='post-thumbnail' expr:alt='data:post.title' expr:src='data:post.thumbnailUrl' width='72px' height='72px'/>
       </b:if>
       <data:post.snippet/>
      </div>
      <div class='jump-link'>
       <a expr:href='data:post.url' expr:title='data:post.title'><data:post.jumpText/></a>
      </div>
     <b:else/>
      <data:post.body/>
     </b:if>
    <b:else/>
     <data:post.body/>
    </b:if>

    2. Read more only for older posts (your latest post will appear normal):

    Find (CTRL + F) and replace <data:post.body/> with:

    <b:if cond='data:blog.pageType != &quot;item&quot;'>
     <b:if cond='data:blog.pageType != &quot;static_page&quot;'>
      <b:if cond='data:blog.url == data:blog.homepageUrl'>
       <b:if cond='data:post.isFirstPost == &quot;true&quot;'>
        <data:post.body/>
         <b:if cond='data:post.hasJumpLink'>
          <div class='jump-link'>
           <a expr:href='data:post.url + &quot;#more&quot;' expr:title='data:post.title'><data:post.jumpText/></a> 
          </div>
         </b:if>
       <b:else/>
        <div>
         <b:if cond='data:post.thumbnailUrl'>
          <img class='post-thumbnail' expr:alt='data:post.title' expr:src='data:post.thumbnailUrl' width='72px' height='72px'/>
         </b:if>
         <data:post.snippet/>
        </div>
        <div class='jump-link'>
         <a expr:href='data:post.url' expr:title='data:post.title'><data:post.jumpText/></a>
        </div>
       </b:if>
      <b:else/>
       <div>
        <b:if cond='data:post.thumbnailUrl'>
         <img class='post-thumbnail' expr:alt='data:post.title' expr:src='data:post.thumbnailUrl' width='72px' height='72px'/>
        </b:if>
        <data:post.snippet/>
       </div>
       <div class='jump-link'>
        <a expr:href='data:post.url' expr:title='data:post.title'><data:post.jumpText/></a>
       </div>
      </b:if>
     <b:else/>
      <data:post.body/>
     </b:if>
    <b:else/>
     <data:post.body/>
    </b:if>

    Settings:

    A. If you want the thumbnail to appear on the left:

    Step 1. Find (CTRL + F) the following piece of code:

    ]]></b:skin>

    Step 2. Just above it, paste this code:

    .post-thumbnail{float:left;margin-right:20px}

    B. If you want the thumbnail to appear on the right,

    Paste above ]]></b:skin> this code:

    .post-thumbnail{float:right;margin-left:20px}

    Click Preview and if it works, click Save Template.

    That's it, enjoy!
    More aboutAuto Read More with thumbnail for Blogger/Blogspot Posts

    Adsense Ad Code Converter

    Posted by Unknown


    This tool automatically converts javascript ad code into the correct format so you can embed it directly into your new xml Blogger template. It’s perfect for converting AdSense, AdBrite, Chitika or any other javascript ad code you may have.


    Instructions: paste your Adsense code in the empty box and then press on the "Convert" button.
    More aboutAdsense Ad Code Converter

    How to put Adsense ads on Blogger/Blogspot

    Posted by Unknown


    If you want to earn money from your site/blog, Google Adsense is the most popular service to monetize your blog or website content. When implemented, Adsense will display targeted Google ads on your blog and they can generate revenue on either a per-click or per-impression basis.
    Of course, to display ads on your site, you should first Sign Up to Google Adsense program.


    Before adding your ads, keep in mind that Adsense allows only up to 3 ad units, 3 link units and 2 search boxes per page.

    In this tutorial i will show you the three ways you can add Adsense ads to your blog.

    1. Adsense Gadget

    Use this method to add ad unit as a widget, in places outside the blog post area. You can position it by simply dragging it in Page Elements, just like any other widget. To add the Adsense Gadget, go to:

    1. Blogger Dashboard >> Design >> Page Elements >> click on the "Add a Gadget" link
    2. From the pop-up window, select AdSense Gadget:

    3. Configure ad format and colors.
    4. Click Save and you're done.

    2. Inline Ads

    This will display an ad unit at the end of each post. To show ads between posts:

    1. Go to Design > Page Elements and click the Edit link in Blog Posts gadget box.


    2. Check the "Show Ads Between Posts" box.


    3. Configure ad frequency, ad format, and colors. Live preview is provided beneath the settings.
    4. Click Save.

    3. Adsense code

    The most notable benefits of using this method are:
    • You can place ad anywhere in your blog
    • You can add the code anywhere in your blog template - in your post content or page.
    • To find out which format perform the best, custom channels will help you to track the performance of specific groups of ad units.
    • You can choose types other than ad unit i.e. link unit, search box.
    To create an ad unit:
    1. Go to Google Adsense website.
    2. Click on My ads tab, go to Ad units and then press on the "New ad unit" button.


    3. Choose your ad type, choose format and colors and assign channels.
    4. When you have finished editing, click on the Save and get code >> button and copy the code provided.

    To add an ad unit to your blog, you have the following options:

    • Paste the code in a HTML/Javascript gadget
    • Paste the code in a blog post or page, or
    • Paste the code direct in your template. (if you choose this option, first you should convert adsense ad code)

    If you have any more questions, leave a comment below.
    More aboutHow to put Adsense ads on Blogger/Blogspot

    How to Disable lightbox in blogger

    Posted by Unknown

    disable lightbox in blogger
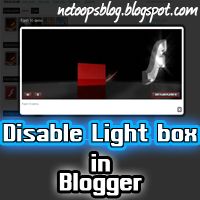
    Blogger also provides lightbox for viewing images.But if you take one image,it will open and the whole pictures in the page are listed ,Sometimes it may be a good feature also a bad feature.Here is a Simple trick to disable lightbox in blogger.


    • Go to Settings->Formatting (as shown in figure)
    •  You see a Option Showcase images with Lightbox select No.
    • That all.No longer Light box appear in your blog.
    More aboutHow to Disable lightbox in blogger

    How To Remove Blogger Threaded Comments

    Posted by Unknown

    The Blogger Threaded commenting system allows a reader to reply to other reader comments on that post. Blogger supports threaded commenting with two levels - the original comment, and the replies to that comment. If you want remove threaded comments from your blogger blog, follow these steps:


    Step 1. Go To Blogger Dashboard > Template > Edit HTML (click on Proceed button if needed)


    Step 2. Select "Expand Widget Templates" (back up your template)


    Step 3. Search (using CTRL + F) for the following code:

    <b:if cond='data:post.showThreadedComments'>
                <b:include data='post' name='threaded_comments'/>
              <b:else/>
                <b:include data='post' name='comments'/>
              </b:if>
            </b:if>
            <b:if cond='data:blog.pageType == &quot;item&quot;'>
              <b:if cond='data:post.showThreadedComments'>
                <b:include data='post' name='threaded_comments'/>
              <b:else/>
                <b:include data='post' name='comments'/>
              </b:if>
            </b:if>

    Step 4. Now remove it (you'll find this code twice and replace it twice) and paste this code instead:

       <b:include data='post' name='comments'/>
              </b:if>
                   <b:if cond='data:blog.pageType == &quot;item&quot;'>
                         <b:include data='post' name='comments'/>
         
            </b:if>

    Step 5. Save Template.

    That was all!

    More aboutHow To Remove Blogger Threaded Comments

    Add Videos/Images in Blogger/Blogspot Comments

    Posted by Unknown

    Many of you may have wondered if it is possible to post Youtube videos and images into Blogger comments. Well, after going through this tutorial, we'll be able to do this!
    add youtube videos and pictures in blogger comments

    To get these cool features, we just need to add some scripts to our template and use the right tags for the images. For adding youtube videos, pasting their URLs will be enough.

    How to add videos/images in Blogger comments

    Step 1. Go to Dashboard > Template > Edit HTML


    Step 2. Find (using CTRL + F) the following tag:
    </body>
    Step 3. Just above/before the </body> tag, paste this code:
    <script src='http://code.jquery.com/jquery-latest.js' type='text/javascript'/>
    <script src='http://fe-blogger.googlecode.com/svn/trunk/youtubevideos.js'/>
    <script src='http://fe-blogger.googlecode.com/svn/trunk/pics-comments.js'/>
    Step 4. Save the changes by clicking on the Save Template button.

    Instructions

    Now each time you want to post youtube videos, just paste their urls in the comment box.
    For adding images, use the tags below before and after the address of your image:
    [img]your-image-url[/img]
    Note: replace your-image-url with the URL

    Settings

    If you want to let your visitors know how to post images in blogger comments, then go to Dashboard > Settings > Posts and Comments and look for the Comment Form Message section, there you need to click on "Add" link and add your text. For example:
    Need to add an image? Use this code <b>[img]IMAGE-URL-HERE[/img]</b>
    After you have added your text, click on the Save Settings button on the top right corner... and you're done :)

    If you enjoy reading this blog, please share and subscribe. For any questions, drop a comment below.
    More aboutAdd Videos/Images in Blogger/Blogspot Comments

    How to add Facebook Like/Fan Box to Blogger

    Posted by Unknown

    A Facebook Fan Box or Like Box is a great plugin that allows blog visitors to subscribe to your blog updates via their Facebook accounts, without leaving your blog. After subscribing (by pressing like button), visitors will receive your most recent blog updates on their Facebook page. This box also displays faces of the "likers" on your blog. Before creating a fan box you should already have a facebook fan page. If you haven't yet created, click here to learn How to Create a Facebook Fan Page.


    Add Facebook Like Box to Blogger

    1. Find out your Facebook fan page URL by visiting your Facebook fan page and copy the url in the address bar, you can see how your url should look like in my screenshot:


    2. Then visit this page: http://developers.facebook.com/docs/reference/plugins/like-box

    3. Paste your url into the Facebook Page URL field as it is shown below:


    4. Once you are satisfied with the looks of the Like Box, click on the "Get Code" button

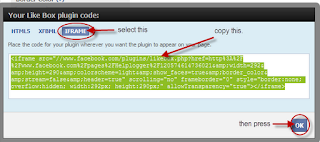
    5. You'll be given two codes, titled HTML 5, XFBML and IFRAME. You only need the iframe code.
    Select it and copy the code generated for your box as it is shown in the example below:


    6. Then go to your Blogger Dashboard > Layout > click on the Add a Gadget link


     7. From the pop-up window, scroll down and select HTML/JavaScript


    8. Paste the code in the empty HTML box.


    9. Click Save and you're done.
    More aboutHow to add Facebook Like/Fan Box to Blogger