How to number comments in Blogger/BlogSpot

Posted by Unknown

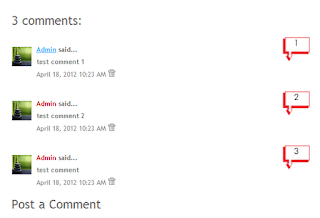
This Blogger hack will show you how to add comment count inside a speech bubble, so that you & your readers can use the numbers to mention or point to a particular comment on any of your posts and besides this, it could as well improve the look and feel of your blog.

Note: This works with the previous blogger commenting system, so if you want to add this hack, you should remove first the Blogger threaded comments. Learn here How to remove Blogger threaded comments

UPDATE! Now you can add comment bubble in your threaded comments too. Read this tutorial:
How to Add Numbered Comments In Threaded Comments
blogger blogspot, tricks

How to add numbered comments on our Blogger/Blogspot blog
how to blog, blogspot blogger

Step 1. Go to Dashboard - Template - Edit HTML (click on Proceed button, if needed)


 Step 2. Select "Expand Widget Template" (make a backup)

    Step 3. Now find (CTRL+F) the following code in your template:

    <b:loop values='data:post.comments' var='comment'>

    Step 4. Immediately above/before it, paste this code:

    <script type='text/javascript'>var CommentsCounter=0;</script>

    Step 5. Find this code:

    <data:commentPostedByMsg/>

    Step 6. And immediately below/after it, copy and paste this:

    <!--comments-count-starts-->
    <span class='comments-number'>
    <a expr:href='data:comment.url' title='Comment Link'>
    <script type='text/javascript'>
    CommentsCounter=CommentsCounter+1;
    document.write(CommentsCounter)
    </script>
    </a>
    </span>
    <!--comments-count-stops-->

    Step 7. Find (CTRL+F) this tag in the template:

    </head>

    Step 8. Paste this code just above/before it:

    <!-- comments-count-starts-->
    <style type="text/css">
    .comments-number a:link, .comments-number a:visited {
    color: black !important;
    text-decoration: none !important;
    background: url(https://blogger.googleusercontent.com/img/b/R29vZ2xl/AVvXsEiRv8eMwRLlh15co5yiCDD-LieX2XLcQHxb1gvYpDMfhRbqyGE3ZETXtGUtnwSWZKwBJF0aJ4fGAEnJb44SFMQdNfclmYkA05TUn0nljz6b4M6ND1K5ZV9nKPeAonkFvEU_oQM__iKT_zJX/s1600/comment+bubble+1.png) no-repeat;
    width: 50px; /*image-width size*/
    height: 48px; /*image-height size*/
    float: right;
    display: block;
    margin-right: 5px;
    margin-top: -15px; /*comments-counter position*/
    text-align: center;
    font-family: 'Century Gothic','Lucida Grande',Arial,Helvetica,Sans-Serif;
    font-size: 15px;
    font-weight: normal;
    }
    .comments-number a:hover, .comments-number a:active {
    color: #1BA0E1 !important;
    text-decoration: none !important;
    }
    </style>
    <!-- comments-count-stops-http://fe-blogger.blogspot.com-->

    Note:
    • To change the comment bubble, replace the red text from above with your own address
    • To change the color of the numbers, replace the blue text with the hex value of your color

    Comment Bubbles 

    To choose a comment bubble, right-click on the image and select "Copy Image Address/Location":


    how to blogblogger blogspotblogspot blogger, how to blogwidget blogger blogspotblogs, how to blogblogspot or blogger, how to blogtutorials, how tocomments, how to, blogspot bloggernew comment, how to blogblog design, bloggerblogger.com


    IMPORTANT: You could use any image instead of the one linked in the code above (STEP 8) but after that, you should modify the size values (width and height), so that the numbers inside the bubble to be correctly adjusted.

    Step 9. Save the template... and enjoy your comments :]

    You might also be interested in this tutorial from the same category:
    How to Add a Comment Bubble to Blogger Post Titles.


    More aboutHow to number comments in Blogger/BlogSpot

    How to Add A Comment Count Bubble To Blogger Post Titles

    Posted by Unknown

    A comment bubble with current number of comments displayed to each blogger post titles could make your blog more attractive. This improves not only your comments count but also allows your visitors to see what are the most popular posts on your blog. When a post has many comments, then the comment bubble will show the popularity of your posts to readers and visitors so that they might be more interested in reading them.

    So let's start adding it:


    Step 1. Go to Dashboard - Template - Edit HTML (click on Proceed button, if needed)


    Step 2. Select "Expand Widget Template" (make a backup)

      Step 3. Find - using CTRL + F - the following piece of code in your template:

      ]]></b:skin>

      Step 4. Add the below code just above ]]></b:skin>:

      .comment-bubble {
      float : right;
      width : 48px;
      height : 48px;
      background : url(https://blogger.googleusercontent.com/img/b/R29vZ2xl/AVvXsEh1s8kaejPeoOajnQLxFD3oxc_vr-oZF6aLBEYu02Tff-9fIixtn12PHNSC3z9HvQBtdCqzYKWaoEN-bhVEOhZZQMm9W_oHcgj5YPrISIxl_JEtlfSVWupNEn_FFIeWtBq7-N-lAhN-aT2T/s1600/speech+bubble+green.png);
      background-repeat: no-repeat;
      font-size : 18px;
      margin-top : -15px;
      margin-right : 2px;
      text-align : center;
      }

      Step 5. Now find this code:

      <b:if cond='data:post.title'>
      <h3 class='post-title entry-title'>

      Note: If you can't find it, search this code instead:

      <b:if cond='data:post.title'>
            <h3 class='post-title entry-title' itemprop='name'>

      Step 6. And add this code immediately after it:

      <b:if cond='data:post.allowComments'>
      <a class='comment-bubble' expr:href='data:post.addCommentUrl' expr:onclick='data:post.addCommentOnclick' style='color: #ffffff; font-size: 18px; font-weight: bold;'><data:post.numComments/></a>
      </b:if>

      Note:
      • to change the color of the comments number, replace #ffffff with the hex value of your color;
      • to change the font size, increase/decrease the 18px value;

      Step 7. Preview your template and if everything is ok, click on Save Template.

      Comment Bubbles 

      You can choose one of the images below - right click on the desired image and select "Copy Image Address/Location", then replace the red code from step 3 with the address you just copied.

      bubble comment count, bubble blogger postsblogger comments, comment countblogger blogspot, blogger commentsblogger bubble comment countcomments in blogger titlesblogger tips, blogger tricksblogger widgets, bubble comment countbubble comment countBubble Comment CountBubble Comment Count, blogger blogspot


      That's it! Enjoy (:

      You might also be interested in reading this tutorial:

      More aboutHow to Add A Comment Count Bubble To Blogger Post Titles

      How to Add Different Backgrounds In Blogger Pages

      Posted by Unknown

      In the last tutorial, you learnt How to Add Different Backgrounds in Blogger Posts. Now this tutorial, will show you how you can have a different background for each of your page, thus giving your pages their own unique look. 


      How to Add Different Background In Blogger Posts/Pages

      Step 1. Log in to your Blogger Dashboard, then go to Template > Edit HTML.


      Step 2. Select "Expand Widget Templates"

      Step 3. Search (CTRL + F) for this tag:


      </head>

      Step 4. Just above the </head> tag, paste this code:

      <b:if cond='data:blog.url == &quot;http://POST-OR-PAGE-URL.html&quot;'>
      <style>
      body {
      background-image: url(http://DIRECT_LINK_TO_BACKGROUND_IMAGE.com/IMAGE.JPG);background-position: center; background-repeat:repeat; background-attachment: fixed;
      }
      </style>
      </b:if>

      Note:
      • Change: http://POST-OR-PAGE-URL.html with the URL address of your blogger post or page where you want the custom background to appear.
      • Change: http://DIRECT_LINK_TO_BACKGROUND_IMAGE.com/IMAGE.JPG with the direct link of your background image.

      Step 5. Click on SAVE TEMPLATE and you're done.

      More aboutHow to Add Different Backgrounds In Blogger Pages

      How to Add Different Background Color or Image in Each Blogger Post

      Posted by Unknown

      When you have multiple authors on a blog and want to make a specific post stand-out, then you can change your posts background color or place a background image behind them, each time is needed. Therefore, this tutorial will show you how to style each post differently by adding some codes in your Blogger posts. (this won't take effect if you have the read more function enabled on your blog)


      How to Change the Color of the Post Background

      When you create a post, switch to HTML, near the Compose tab and add the following code just at the beginning and at the end of your post content.

      <div style="background-color: #DCC368; padding: 5px 8px 5px 8px;">
      Your text goes here...
      </div>

      • add the red line at the BEGINNING of your post.
      • add the div tag in blue at the END of your post.
      • replace the part in green with your own color (search for color's hex value)
      • "Your text here...." is where the Post content goes

      It's done by wrapping your Post content into a "div" element. You can apply this setting anytime to your already published posts as well or you can change/remove it later.

      Here's the example of the placed code in the Post Edit box:
      blogger posts color, backgrounds, blogger tricks

      How to Add a Background Image in a Blogger Post

      Add the following code just at the beginning and end of your post content.

      <div style="background-image: url(IMAGE-URL-HERE); background-repeat: no-repeat; ">
      Your text goes here...
      </div>

      • in green, you need to paste the URL address of your hosted picture (use Photobucket, Tinypic etc.)
      • the red line has to be added at the beginning of your post.
      • the blue part has to be added where your post ends.
      • "Your text here...." is where your Post content should be

      Now click Publish and you are done.

      More aboutHow to Add Different Background Color or Image in Each Blogger Post

      How to Create Static Pages in Blogger

      Posted by Unknown

      What are Blogger static pages? 

      Blogger Static Pages allows you to create specific pages like About Me, Contact page, Privacy Policy etc. on stand-alone pages that are linked from your blog. The static pages basically are the same as post pages, but there are several things that make them different. One of the differences is that static pages don't appear in the home page, don't have a label, and are not indexed as archive pages.


      How to Create Static Pages in Blogger.

      Step 1. Log in to your Blogger Dashboard

      Step 2. Click on Pages
      static pages blogger, blogger tutorials, widgets


      Step 3. Click on New Page - Blank Page

      Step 4. Type the title and write the page's content.


      Step 5. Before publishing it, click on Preview to see how it will appear on your blog.

      Step 6. When you have finished the editing, click on Publish button.

      Step 7. Now you have 3 options:
      1. Keep it as nav menu below header - Top tabs
      2. Display the page in your blog's sidebar - Side Links
      3. Add the page's link manually to your template - Don't Show

      Step 8. After you have chosen where the page will appear, click on the Save arrangement button


      And now you're done!
      Now you have owned the static page. If you want another static page, just repeat the steps above.

      Note: if you have opted for Don't show option: go to Pages again and right click on the page's title and select Copy link location (in firefox). You can add the link manually to your sidebar via Link widget or add the link in your template, via Edit HTML.

      If you need more help, leave a comment below.

      More aboutHow to Create Static Pages in Blogger

      Tips To Avoid Your Google Adsense Account From Getting Banned

      Posted by Unknown

      As many of you already know, Google Adsense is the most popular and generous advertisment service from Google that gives you recurring income. However, some people don't bother to read the Adsense policies and they usually violate AdSense Terms and conditions without knowing and as a result, later to find out that their accounts have been disabled. Many times, fraud clicks are the main cause. But there could be many other reasons for an Adsense account to be disabled.

      So, if you want to keep your Google Adsense account safe, please read and keep in mind the following rules:

      1. Never use adult, violent or advocating racial intolerance content on your site.
      2. Never copy paste any article from any other website. Google can easily find out which one is original.
      3. Never click on your own ads. Google can analyze all the clicks made on your ad units.
      4. Never place above your Adsense ad units texts like "Click on ad below", "Please click below" etc. instead you can use label headings as "sponsored links" or "advertisements".
      5. Never say your friends to click on your ads on social networking websites like Facebook
      6. Don't put unwanted links, pop-ups on your website. Keep interface quite neat and clean with proper navigation and all. Google also looks for the quality standard of websites.
      7. You must have a privacy policy page which must contain a description about the use of Google AdSense on your website. This is the latest policy introduced by Google. Many webmasters don't know about it which results in their account getting banned.
      8. Hide Adsense ad units from Contact and Privacy Policy page (read here to see how you can do that) Place ads only on Content Pages. Advertisers pay only for content based ads.
      9. Never display Adsense ads in floating boxes with images or texts that could overlap or cover the ads. However, you can use floating text, images on your website under the condition they don't play with your Adsense ads.
      10. Never place more than 3 ad units and 3 ad links or 2 adsense search boxes on any web page.
      11. Do not confuse with adjacent images - It was a common policy to increase CTR by placing same number of images as the number of text ads, which falsely gave the impression that the text ads represented an explanation to these images. Inserting a small space or a line between the images and ads is not allowed. Make sure that the ads and images are not arranged in a way that could easily mislead or confuse your visitors. Read more about this here
      12. Do not send your Google adsense ads code to anyone.
      13. Never place your Google ads any unit under any drop down menu, if you do so you are Violate Google Adsense TOS.
      14. Never place Adsense ads on empty pages (pages with no content), pop-up pages, error pages, contact forms or registration pages.
      These rules are the minimum requirements for maintaining an AdSense account in a proper way.
      Whenever needed, it is better to ask for adsense help from the learned staff of Google Adsense. At least, you'll get authorized and very helpful tips from them! Good luck and be wise :)

      More aboutTips To Avoid Your Google Adsense Account From Getting Banned