Cinta Awet Seperti Permen Karet

Posted by Unknown


1.     Jujur

Bila ada yang tidak kita sukai dari doi, lebih baik jujur. Kalo' perlu, obrolin saat kita dan dia sedang berduaan saja. Ngga' apa-apa kok, agak sakit sedikit, tapi enak belakangan hari. Seperti, kita ngga' suka melihat kalo' doi terlalu baik, mau mengantarkan semua teman cewe'nya. Ya boleh deh, kita terus terang aja, daripada saling sindir atau berantem.
2.     Be Yourself

Jadi diri sendiri, paling baik. ngga' perlu mengubah diri kita menjadi orang lain. Misalnya, kita biasa mengenakan baju casual, jangan lantas berubah pake tank top, rok mini, hanya karena doi.
3.     Tulus

Bila kamu mencintai dia, ya tulus aja. Jangan berharap dia akan membalas dengan jumlah sama. Bila sudah menolong dia, misalnya, jangan diungkit-ungkit atau jadi perhitungan
4.     Terbuka

Ngga' perlu bohong, soal teman-teman kamu. Terbuka aja, selama ini kita deket dengan siapa dan biasa menghabiskan waktu dimana. Selain doi jadi ngga was-was, kamu juga enak, ngga' perlu sembunyi-sembunyi.

5.     Kata "Maaf"

Maaf memang ada batasnya. Namun, ngga' ada salahnya juga kamu selalu siapkan kata maaf. Namanya juga manusia. Pasti ada salah dan ngga' sempurna. Kita sendiri kan ngga' perfect.
6.     Kejutan

Jangan segan kita memberi kejutan buat sidia. Misalnya, kita buatkan makanan kesukaannya atau bawakan sekotak coklat. Mmmmm ... doi pasti tambah care sama kamu.

7.     Care


Perhatian ! Pasti.Nngga' perlu mengorbankan rupiah, tapi perhatian sekecil apapun berguna banget. Misalnya, doi sakit. Cek deh, sudah makan apa belum. Atau tengok sebentar saja, bagaimana dengan pelajaran dia yang tertinggal.

8.     Dekat Keluarga


Awas ! Pacaran dengan doi, berarti kita juga wajib dekat dengan keluarganya. Minimal, kamu kenal dengan mereka. Sehingga, jika ada apa-apa, komunikasinya mudah. Kamu pun bisa mendapat dukungan dari mereka lho.

9.     Ngga' Posesif

Memang sih, ngga' enak kalo' ngeliat doi kita akrab dengan banyak orang. Tapi ngga' perlu posesif, kamu selalu memantau dia ada dimana, bersama siapa, dan lagi ngapain. Wah, lama-lama bete juga lho, diawasi seperti pesakitan !

10.     Hargai Privacy

Meskipun kita dan doi terbuka, ngga' semua hal bisa dibicarakan berdua. Hargai juga privacy dia. Apa yang perlu kita ketahui dan apa yang sebaiknya jangan kita campuri.


More aboutCinta Awet Seperti Permen Karet

Search Engine Optimization Tips For Bloggers 2014

Posted by Unknown

Search Engine Optimization is a need of every blog to grow and to receive organic traffic (traffic from search engines). Here at BloggerTipsTricks I have shared lot of SEO tips in past with my readers. Here is a roundup of all those tips that help you to grow your blog and reach it to the next level. SEO tips and tricks that I have shared in past are essential and should be keep in mind to build up your blog authority and value in search engines. If your blog is search engine optimized then no doubt your all posts will receive decent organic traffic and lot of shares on social media sites like facebook, twitter, Google Plus etc if you have added a social sharing widget in your blog. So, take a look which tips you have read and which of them you missed.

Search Engine Optimization Tips for Blog

Below is the list of SEO tips with categories so that you can understand each tip with its value and use. Please read all these tip carefully if you are serious about your blogging goals.

Search Engine Submission

  1. Google Webmaster Tools Verification Tips for Blogger: This post comes under Search Engine Submission. To drive traffic from search engines the first step you should take is submit your blog in Google Webmaster Tools.
  2. How to Submit Blogger Sitemap to Google Webmaster Tools?: Once you submit your blog in Google Webmaster Tools, the next step you have to do is submit a sitemap which tells search engines about your blog posts and new updates in your blog.

Tips to Increase Traffic

  1. 6 Tips to Increase Blog Traffic: This is what we need to achieve your blogging goals. As you already know that traffic is the thing that every blogger wants. Without traffic and readers who will read our content which we have written and providing at our blog.
  2. Top 5 Tips to Increase Blog Page Views: This is a list of top 5 tips that can help you to increase your blog page views which is very important in terms to build blog readership.
  3. 4 Benefits of Internal Linking in SEO: Here I have shared what is internal linking and what are the benefits you can get by internal link your old posts to new one.

Tips to Build Quality Backlinks

  1. 4 Tips to Build Quality Backlinks: This is very popular post of this blog which have detailed information about all the strategies to build quality backinks in post panda and penguin world.

Image Optimization Tips

  1. Add Title and Alt Attribute to Optimize Images For SEO: You probably use images in your blog posts to describe your topic. Images really enhance our blog posts and make our content more eyes catching but if we keep some things in mind at the time of adding images in our blog posts then these images can also bring us traffic. Read this post to know more about image optimization.
  2. 6 Tips to Optimize Images For SEO to Increase Blog Traffic: You should also know how you can optimize images before adding them into your blog posts. You must read this post because it covers all the tips in details with examples.

Blog Optimization Tips for Search Engines

  1. How to Reduce Blog Bounce Rate?: If you don’t know what bounce rate is and how to decrease it then I strongly recommend you to read this post. Bounce rate should not be ignored if you want success in your blogging career.
  2. 9 Tips to Reduce Blog Load Time: Fast loading blogs and websites receive more credits from search engines because nobody likes to read those blogs which takes too much time to load. Read this post and reduce your blog load time today.
  3. How to Add Breadcrumbs in Blogger?: Breadcrumbs are known as navigational trail which helps to increase your blog traffic and to decrease its bounce rate. You should know what breadcrumb can do for your blog.

Feedback!

This is a complete list of SEO tips which I have shared on my blog till now. Hope you guys like this post. If you don’t want to miss any update in future then make sure you have subscribed this blog. If not done yet then subscribe now using below subscription box. Thanks for you,,,,

More aboutSearch Engine Optimization Tips For Bloggers 2014

9 Tips To Reduce Blogger Blog Load Time

Posted by Unknown

Loading time of a blog is really an important factor in SEO’s prospective. Every webmaster should care for his/her blog’s loading time because now a day’s major search engines consider load time as a ranking factor specially Google. Beside this, visitors also don’t like such sites that take too much time to load. They will surely press back button and go to another place for the information they are searching for. It will also increase bounce rate that affects your blog ranking. So, Today I decided to share my own way on how to reduce load time in Blogger Blog. Below are some very important tips that you can use to optimize your blog load speed.

Tips To Reduce Blog Load Time

1# Avoid JavaScript
JavaScript makes page loading speed slow. Try to remove unnecessary JavaScript codes from your blog. Don’t link to external sites for storing your JavaScript codes whilst you can save them inside your blogger blog. You can save your all JavaScript codes in your template above </head> by using the code below
<script type=’text/javascript’>
//<![CDATA[
Paste Your JavaScript Code Here//]]>
</script>
Just replace the bolded text with the JavaScript code you want to store in your template.
2# Widgets and Social Media Buttons
Widgets and social media buttons are really very important but use of too many social media buttons and unnecessary widgets can slower your blog. Try to remove widgets that are not really necessary for your blog and use social media buttons wisely.
3# Give Proper Dimensions To Images
Always give proper height and width to the images you are using in your posts, because it help the browsers to load the image quickly. To give height and width attribute to your images use below code.
<img width=”” height=”” src=”URL Of Image” /> 
4# Don’t Use An Image As A Background
If your blog template have image as a background, then remove it. A background image is responsible for slow loading speed. Always use background colors not an image. To remove background image simply search below code and remove it from your template.
body { background: #B3B3B3 url(http://abc.com/background-image.jpg);
The code will surely be different in your template. To remove background image, search this type of code in your template and simply remove the text which looks like the bold text.

5# Reduce Advertisement On Blog
Advertisement banners are coded with JavaScript. As I already told you in tip no 1 that too much use of JavaScript make blog loading speed slower. So please use limited advertisements on your blog.
6# Limited Number Of Posts At Home Page
Try to show only 4-5 posts at your Homepage because if you use too many posts to show at Homepage then it will take more time to load. Fast loading Homepage keeps your visitors happy and they will stay at your blog for long time. If you don’t know how to set number of posts on Homepage then see the screenshot below.
7# Always Use Quality Blogger Templates
Most of newbie bloggers do this mistake. They upload any template that attracts them. There are lot of templates available on the internet but most of them are improper scripted. Using of those templates make job tough for search engine spiders to crawl your blog. Choose theme wisely for your blog which should be designed by professionals.
8# Use Read More Link To Summarize Blog Posts At Homepage
Always summarize your blog post for Homepage by using a read more link. It has two benefits:
9# Eliminate External Links
Eliminate all unnecessary external links from your blog. One common example for this is using stat counters. You can use Google Analytics instead of stat counter widgets to check your website traffic status.

How To Check Blog Load Speed?

There are lot of tools available on the internet which can be used to check your blog load time. Here I am listing two famous tools.
Just open the link and type your blog address like this.
http://www.your-blog-address.blogspot.com/

Feedback!

These are 9 Tips that you can apply to improve your blog loading speed. If you are aware with more tips that can help to reduce load time in blogger blogs, then please share them with me through comments. Your help will be appreciated.
More about9 Tips To Reduce Blogger Blog Load Time

Add Basic On Page SEO Tips For Blogspot Blogs

Posted by Unknown


Search Engine Optimization (SEO) is the most important thing to learn for best blogging experience. Without proper blog optimization, we can’t even dream to get impressive traffic from search engines. From past few days, I am getting too much request of newbie bloggers to share some On-Page SEO Tips. That’s why today I plan to mention all those On Page SEO tips which I already shared on my blog in my earlier posts. I’m sorry if you have read those posts before, but I need to grab attention of newbie bloggers who just start learning SEO for their blog. All those tips are must to know by every blogger. So, let’s take a look on best On-page SEO Tips for Blogspot Blogs and if you have read them before then don’t ignore this post. May be you learnt something new which you ignore before because of any reason.


On Page Search Engine Optimization Tips For Blogspot

Below are the tips and tricks that will be beneficial for you to optimize your blog for Google and other search engines. Read them carefully and apply all of them on your blog to make your blog lovable and trust worthy for search engines.

Custom Robots Header Tags

There are some settings for bloggers that they can personally do for their blogs to make their blogs for SEO friendly. Custom Robots Header Tags setting in one of them. It’ll be beneficial for you to use custom robots headers tags correctly. It’s easy to manage these settings. Just take a look at below tutorial.

Custom Robots.txt

Search engine bots like Googlebot (Web Crawling Robot of Google) needs some guidelines on how they have to crawl and index our blog. We can prevent some non important pages labels pages from indexing in Google to protect our blog from duplicate content issues. Got confused? Check out below tutorial which will clear all of your confusions.

Optimize Blog Post Titles

If you just started your blog on blogger’s default template, then definitely you’ll not be aware with this fact that your post titles are not properly optimized for search engines. You need to do some editing in your blog template to make your post titles properly optimized. You will see a noticeable change in organic traffic of your blog after making this change. Follow the instructions given in below mentioned post.

Image Optimization

You may definitely notice relevant images between the posts on many blogs. Images not only enhance the look of our content, but it also plays an important role to optimize our blog posts. If we make effective use of images in our blog posts, then we can attain extra traffic from search engines. Follow below post to learn more on image optimization in blogger.

Internal Linking SEO

Many bloggers fail to optimize their internal links or even they don’t link their posts to each other internally. This is really a big mistake that we must avoid. Internal linking not onlyincreases our blog page views but also help our posts to rank well in search engines. If you are also doing the same mistake, then you must need some tips to optimize your internal links.

Search Engine Submission

When we are ready with our blog optimization, then we need to submit our blog in Google’s webmaster tool. Verifying and submitting our blog in Google webmaster tool helps it to get indexed in Google super fast. It also tells about our blog issues like broken links, HTML improvements etc that we must try to resolve. We just need to verify our blog ownership and submit a sitemap. That’s it. If you have not added your blog GWT, then I recommend you to read below tutorial.

Improve Your Blog Load Time

If your blog takes lot of time, then visitors will go back and never come back again. It will increase bounce rate of your blog and you’ll lose your valuable traffic. Search engines give more value to fast loading blogs because they want to build best user experience. That’s why it’s very important to optimize blog loading time. I have shared some best tips that can help you to enhance your blog’s loading speed.

Feedback!

I have mentioned all the On page SEO Tips for Blogspot Blogs in this post which I shared in my blog till yet. I’ll provide more quality tips and tricks in my future posts. All these tips have their own value. So, don’t ignore a single one and optimize your blog as much as possible to get flow of traffic on your blog. Wish you success for your blogging goals. thank for you
More aboutAdd Basic On Page SEO Tips For Blogspot Blogs

Dark Template

Posted by Unknown

dark template fe-blogger

Before anything you need to backup the current template. This is very important so you can always go back in case you come across any error.

Backup Current Template


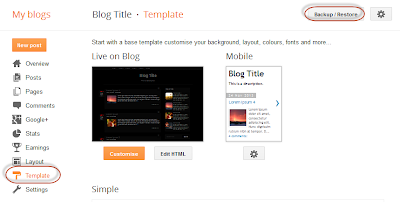
Go to your Blogger Dashboard, select your blog > click on the Template option on the left side, then press the "Backup/Restore" button.

backup restore blogger template

For downloading your current template, click on the Download full template button:

download full template blogger

Upload the Dark Template 


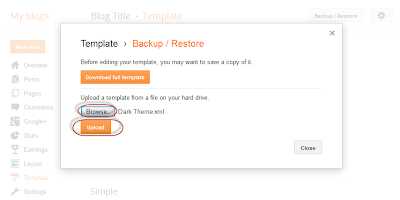
To apply the Dark Template > click on Browse, search for the xml file that you have downloaded, select it and then press on the Upload button:
upload blogger template

Settings


1. Edit the Main Navigation Menu

Go to Blogger, select Template > click on Edit HTML button and search for the html code below (press CTRL + F keys). After you found it, replace 'Link URL' (without the quotes) to the ULR/address of the link that you want to target, also change the title of the link.
<li><a href='Link URL'>Title 1</a></li>
Change these lines as well:
<li><a href='Link URL'>Title 2</a></li>
<li><a href='Link URL'>Title 3</a></li>
<li><a href='Link URL'>Title 4</a></li>
<li><a href='Link URL'>Title 5</a></li>
<li><a href='Link URL'>Title 6</a></li>
If you want to add another link, then simply paste this code just below the last line:
<li><a href='Link URL'>Title here</a></li>
Screenshot:


2. Change the format of the date header

Go to Settings => Language and formatting and choose the Date Header Format, as shown in the picture below:


3. Add the widgets

- Last Comments widget

Go to Layout > click on the "edit" link from the "Last Comments" gadget and paste this code inside the empty box:
<ul id="lastcomments">
<script src="http://your-blog-here.com/feeds/comments/default?alt=json-in-script&callback=showrecentcomments_avatar"></script>
</ul>
Replace http://your-blog-here.com with the url of your blog or site. Then save the gadget.

- Search widget

click on the edit link from the HTML/JavaScript gadget and paste this code inside the empty box:
<style>
#search-box {
position: relative;
width: 100%;
margin: 0;
}
#search-form
{
height: 40px;
border: 1px solid #121212;
-webkit-border-radius: 5px;
-moz-border-radius: 5px;
border-radius: 5px;
background-color: #070707;
overflow: hidden;
}
#search-text
{
font-size: 14px;
color: #ddd;
border-width: 0;
background: transparent;
}
#search-box input[type="text"]
{
width: 90%;
padding: 11px 0 12px 1em;
color: #333;
outline: none;
}
#search-button:hover {
background: #282828;
}
#search-button {
border: 1px solid #121212;
position: absolute;
top: 0;
right: 0;
height: 38px;
width: 80px;
font-size: 14px;
color: #777;
text-align: center;
line-height: 38px;
border-width: 0;
background-color: #000000;
-webkit-border-radius: 5px;
-moz-border-radius: 5px;
border-radius: 5px;
cursor: pointer;
}
</style>

<div id="search-box">
<form id="search-form" target="_top" method="get" action="/search">
<input id="search-text" type="text" placeholder="Search here..." name="q" />
<button id="search-button" type="submit">
Search
</button>
</form>
</div>
Screenshot:


Enjoy!
More aboutDark Template

Free Website Widgets Popolars Posts Animation For Blogger

Posted by Unknown

Salam semua rekan blogger, pada postingan yang lalu saya telah membahas tentang Free Website Widgets Popular Posts Untuk Blogger dan pada kesempatan ini saya akan menambahkan sedikit koleksi widget yang saya temukan di om google, dimana kita semua tahu bahwa widget populars post sangat penting untuk sebuah blog/websit, hal ini sangat bermanfaat untuk meningkatkan SEO blog kita, dengan adanya Widget Populars Post ini akan menambahkan minat pengunjung ke blog kita apalagi dengan penampilannya yang sangat menarik dipandang mata, kali ini saya akan membagikan Free Website Widgets Popolars Posts Animation For Blogger kepada anda yang nantinya akan anda tambahkan di blog anda (jika anda tertarik), Widget Populars Post ini akan mempercantik tampilan blog anda, sebagai contohnya anda bisa melihat gambar diatas atau anda bisa melihat di blog saya... nah, yang jadi pertanyaanny sekarang bagaimana cara menambahkan Custum Widget Popolars Posts Animation For Blogger. anda jangan pusing dulu, karena disini saya akan menjelaskan sedetil mungkin kepada anda step by step... langsung ke TKP.....

Untuk memudahkan anda memahami penjelasan ini nanti, saya akan menambahkan beberapa gambar panduan dari tahap awal hingga selesai.. silahkan dipraktekkan.

- Langkah pertama yang harus anda lakukan adalah Masuk ke Dashboard Blogger anda


seperti gambar di atas click pada tap tata letak dan selanjutnya akan tampil halaman seperti ini


Setelah terlihat halaman seperti ini anda harus click tombol Tambahkan Gadget Lihat no 2 gambar di atas, lalu akan muncul halaman seperti ini,


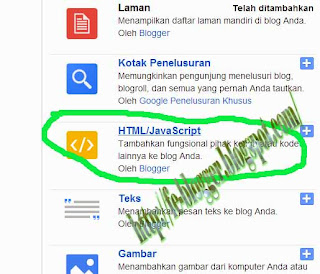
Pilih menu HTML/JavaScrip seperti yang saya lingkari di atas, lalu anda akan diarahkan ke halaman inti Widget Populars Post ini, lihat gambar di bawah ini


Pada tahap ini anda harus mengisi Judul widget di kolom paling atas, silahkan anda isi sesuka hati anda, mau tulis populars post, Hot Post, atau apa aja yang ada di pikiran anda terserah..
Lalu copy Code di bawah ini dan paste tepat di kolom tengah, selanjutnya click tombol simpan..

<style type="text/css">
#rp_plus_img{height:385px;overflow:hidden;border:0;padding:2px 3px 3px 2px;background:transparant}
#rp_plus_img ul{list-style-type:none;margin:0;padding:0}
#rp_plus_img li{border:solid 1px #ccc; margin:0;height:82px;padding:5px; list-style:none;-moz-border-radius: 10px; border-radius: 5px}
#rp_plus_img li:hover{background-color: #EFFBEF;}
#rp_plus_img a{color:#d90000;font-weight:bold}
#rp_plus_img .news-title{display:block;font-weight:400 !important;margin-bottom:3px;font-size:11px;}
#rp_plus_img img{float:left;margin-right:10px;padding:4px;border:solid 1px #ccc;width:65px; height:65px;-moz-border-radius: 10px; border-radius: 5px;}
</style>
<script type="text/javascript" src="http://ajax.googleapis.com/ajax/libs/jquery/1.4.2/jquery.min.js"></script>
<script type="text/javascript" src="http://tugasku4u.googlecode.com/files/Slideshow-artikel-terbaru-New-2013.js"></script>
<script type="text/javascript">
var speed = 1500;
var pause = 3500;
$(document).ready(function(){
rpnewsticker();
interval = setInterval(rpnewsticker, pause);
});
</script>
<ul id="rp_plus_img">
<script style="text/javascript">
var numposts = 20;
var numchars = 40;
</script>
<script src="/feeds/posts/default?orderby=published&alt=json-in-script&callback=rpthumbnt"></script>
</ul>

setelah langkah di atas selesai semuanya, tahap terakhir yang harus anda lakukan adalah click tombol Simpan Setelan
Lihat gambar di bawah ini


Sampai tahap ini anda sudah selesai menambahkan Custum Widget Popolars Posts Animation For Blogger dan lihat hasilnya untuk membuktikan bahwa anda benar-benar berhasil melakukannya,,,,
demikian seo optimization tips kali ini selamat mencoba dan happy blogging for you..
silahkan bertanya dalam komentar, saya akan sangat senang dengan komentar dari sahabat semua...
More aboutFree Website Widgets Popolars Posts Animation For Blogger

Free Website Widgets Popular Posts Untuk Blogger

Posted by Unknown

Widget Popular Posts di blogger biasanya selalu ditampilkan dengan gaya default oleh Blogger , dan juga bias kita tampilkan dengan gaya dam warna yang berbeda di blogger dengan sedikit mengedit template. Namun, sangat mudah untuk menyesuaikan Widget Popular Posts di Blogger , Anda hanya perlu mengedit kode acak  yang secara otomatis dibuat oleh Blogger ketika Anda menambahkan posting terbaru dari halaman Tata Letak Anda.

Free Website Widgets  yang berwarna yang akan membuat posting populer yang super indah. Widget Popular Posts ini diciptakan oleh orang lain, tapi saya telah memodifikasi sedikit , sekarang mari kita mulai bagaimana cara menambahkan Custum Widget Popular Posts di blogger. Setelah menambahkan widget ini ke blog Anda , posting populer di blog Anda akan melihat persis seperti yang Anda lihat di gambar.

Bagaimana Cara menambahkan Widget Popular Posts Untuk Blogger ?

Ikuti langkah-langkah berikut ini :


  • Masuk ke Dashboard Blogger anda


    • Arahkan kursor ke tanda panah sebelah kanan atas dan Klik menu template Template -> Edit HTML


    • Lalu cari  kode </b:skin> (caranya lihat gambar di bawah ini)


    Jika Anda tidak terbiasa dengan halaman baru Blogger HTML, kamu hanya tinggal melihat gambar di atas bagaimana cara  untuk menemukan kode </ b: skin>, jika kamu menemukan kode <b:skin> ... </ b: skin> klik tanda panah di sebelah kiri dan semua kode css akan terlihat.


    • Langkah selanjutnya adalah copy kode di bawah ini dan paste diatas kode </ b: skin>:
    #PopularPosts1 ul li a:hover{color:#fff;text-decoration:none}
    #PopularPosts1 ul li a {-webkit-text-size-adjust: auto; -webkit-text-stroke-width: 0px;  color: #333333; display: block; font-family: Georgia, 'Times New Roman', Times, serif; font-size: 13px; font-style: normal; font-variant: normal; font-weight: normal; letter-spacing: normal; line-height: 18px; margin: 0px 10px 0px -5px; min-height: 30px; orphans: 2; padding: 0px; text-align: -webkit-auto; text-decoration: none !important; text-indent: 0px; text-transform: none; white-space: normal; widows: 2; word-spacing: 0px; }
    #PopularPosts1 ul li .item-thumbnail{float:left;border:0;margin-right:10px;background:transparent;padding:0;width:51px;height:51px}
    #PopularPosts1 ul li:first-child:after,
    #PopularPosts1 ul li:first-child + li:after,
    #PopularPosts1 ul li:first-child + li + li:after,
    #PopularPosts1 ul li:first-child + li + li + li:after,
    #PopularPosts1 ul li:first-child + li + li + li + li:after,
    #PopularPosts1 ul li:first-child + li + li + li + li + li:after,
    #PopularPosts1 ul li:first-child + li + li + li + li + li + li:after,
    #PopularPosts1 ul li:first-child + li + li + li + li + li + li + li:after,
    #PopularPosts1 ul li:first-child + li + li + li + li + li + li + li + li:after,
    #PopularPosts1 ul li:first-child + li + li + li + li + li + li + li + li + li:after{position:absolute;top:10px;right:5px;border-radius:50%;border:2px solid #ccc;background:#353535;-webkit-box-shadow:0px 0px 5px #000;-moz-box-shadow: 0px 0px 5px #000;width:30px;height:30px;line-height:1em;text-align:center;font-size:28px;color:#fff}
    #PopularPosts1 ul li:first-child + li + li + li + li + li + li + li {background:#DF01D7;width:90%}
    #PopularPosts1 ul li:first-child + li + li + li + li + li + li + li:after{content:"8"}
    #PopularPosts1 ul li:first-child + li + li + li + li + li + li + li +li{background:#B041FF;width:90%}
    #PopularPosts1 ul li:first-child + li + li + li + li + li + li + li + li:after{content:"9"}
    #PopularPosts1 ul li:first-child + li + li + li + li + li + li + li +li +li{background:#F52887;width:90%}
    #PopularPosts1 ul li:first-child + li + li + li + li + li + li + li + li + li:after{content:"10"}
    #PopularPosts1 ul li:first-child + li + li + li + li +li{background:#7ee3c7;width:90%}
    #PopularPosts1 ul li:first-child + li + li + li + li + li:after{content:"6"}
    #PopularPosts1 ul li:first-child + li + li + li + li + li +li{background:#f6993d;width:90%}
    #PopularPosts1 ul li:first-child + li + li + li + li + li + li:after{content:"7"}
    #PopularPosts1 ul li:first-child + li + li + li + li{background:#33c9f7;width:90%}
    #PopularPosts1 ul li:first-child + li + li + li + li:after{content:"5"}
    #PopularPosts1 ul li:first-child + li + li + li{background:#c7f25f;width:90%}
    #PopularPosts1 ul li:first-child + li + li + li:after{content:"4"}
    #PopularPosts1 ul li:first-child + li + li{background:#ffde4c;width:90%}
    #PopularPosts1 ul li:first-child + li + li:after{content:"3"}
    #PopularPosts1 ul li:first-child + li{background:#ff764c; width:90%}
    #PopularPosts1 ul li:first-child + li:after{content:"2"}
    #PopularPosts1 ul li:first-child{background:#ff4c54 ;width:90%}
    #PopularPosts1 ul li:first-child:after{content:"1"}
    #PopularPosts1 ul{margin:0;padding:0px 0;list-style-type:none}
    #PopularPosts1 ul li{position:relative;margin:6px 0;border-radius:25px 0px 25px 0px;border:2px solid #f7f7f7;-webkit-box-shadow:3px 3px 3px #000;-moz-box-shadow: 3px 3px 3px #000;padding:10px;}
    #PopularPosts1 img {
    border-radius:200px;
    width:60px; height:60px;
    margin-left:4px;
    }


    • Langkah terkhir adalah simpan template anda dan selesai....!

    Lihat blog kamu untuk melihat Custum Widget Popular Posts Untuk Blogger  yang indah di sidebar. Jika kamu belum menambahkan Widget Popular Posts maka tambahkan dan pilih 5 posts yang ditampilkan.
    demikianlah search engine optimisation tips kali ini semoga bermanfaat.
    Ceria & Nikmati, jika kamu menghadapi masalah, maka beritahu saya dengan memberikan komentar pada posting ini. Selamat mencoba.. thank..
    More aboutFree Website Widgets Popular Posts Untuk Blogger

    Free Website Widgets Label Yellow For Blogger

    Posted by Unknown


    Salam semua sahabat blogger di seluruh penjuru dunia, pada kesempatan ini saya akan membagikan sebuah tutorial atau search engine optimisation tips kali ini yaitu cara menambahkan Custum Widget Label Yellow For Blogger, seperti yang kita  lihat pada gambar terlihat sangat menarik dan sangat berguna bagi blog kita, widget ini berguna untuk membuat kategori semua postingan kita sehinggga para pengunjung sangat mudah menemukan apa yang mereka cari dan pengunjung juga akan betah dihalaman blok kita karena tampilannya menarik dan teratur,,

    oke, tanpa memperpanjang mukaddimah saya langsung saja ke pokok permasalahan kita yaitu cara membuat Widget Label Yellow For Blogger, ikuti langkah-langkahnya sebagai berikut :


    • Masuk ke Dashboard Blogger anda
    •      Arahkan kursor ke tanda panah sebelah kanan atas dan Klik menu template Template -> Edit HTML


  • Lalu cari  kode ]]></b:skin> (caranya lihat gambar di bawah ini)

      •      Kalau sudah ketemu Copy Kode dibawah ini dan paste kode ini tepat di atas ]]></b:skin>

            .Label li:before {

              background-image: -moz-linear-gradient(left top , #FEDA71, #FEBA47);

              border-bottom: 1px solid #D99D38;

              border-left: 1px solid #D99D38;

              content: "";

              height: 1.39em;

              left: -0.69em;

              position: absolute;

              top: 0.2em;

              transform: rotate(45deg);

              width: 1.3em;

              z-index: 1;

          }

          .Label li:after {

              background: none repeat scroll 0 0 #FFFFFF;

              border: 1px solid #D99D38;

              border-radius: 4.167em 4.167em 4.167em 4.167em;

              box-shadow: 0 1px 0 #FAEABA;

              content: "";

              height: 0.5em;

              left: -0.083em;

              position: absolute;

              top: 0.667em;

              width: 0.5em;

              z-index: 9999;

          }

          .Label li {

              background-image: -moz-linear-gradient(center top , #FEDA71, #FEBA47);

              border-bottom: 1px solid #D99D38;

              border-radius: 0 0.25em 0.25em 0;

              border-right: 1px solid #D99D38;

              border-top: 1px solid #D99D38;

              box-shadow: 0 1px 0 #FAEABA inset, 0 1px 1px rgba(0, 0, 0, 0.1);

              color: #996633;

              float: left;

              font-family: 'Helvetica Neue',Helvetica,Arial,sans-serif;

              font-size: 0.75em;

              font-weight: bold;

              list-style: none outside none;

              margin: 0 0 7px 20px;

              padding: 0.417em 0.417em 0.417em 0.917em;

              position: relative;

              text-decoration: none;

              text-shadow: 0 1px 0 rgba(255, 255, 255, 0.4);

              z-index: 1;

          }

      •      Lalu simpan template anda, dan refres halaman blogger anda selanjutnya lihat hasilnya.
           Demikianlah cara menambahkan Custum Widget Label Yellow For Blogger, Semoga tulisan ini dapat membantu anda dan saya berharap jika ada yang ingin saudara tambahkan silahkan berkomentar di bawah ini, saya akan sangat senang dengan komentar teman-teman blogger,, selamat menikmati dan terima kasih atas perhatiannya telah berkunjung ke blog saya ini..
      Anda juga bisa membaca Free Website Widgets Label Cool Effec di postingan saya sebelumnya

      More aboutFree Website Widgets Label Yellow For Blogger