How To Disable or Turn Off Lightbox View For Blogger Images

Posted by Unknown

When you click on your images or photos, a wide black iframe window opens without leaving the page and shows you the image in foreground. This Lightbox (also called as Greybox or thickbox) view effect is enabled for all Blogger blogs by default, and it can be found also on Facebook and Google +. However, for some people this effect has turned into a headache and some may prefer to turn it off.

How to disable Lightbox view?
  • Log in to your Blogger Dashboard 
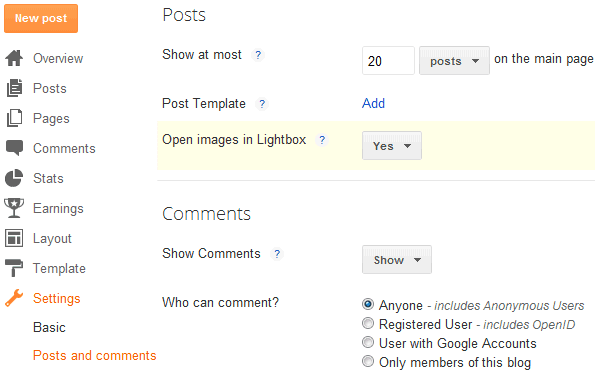
  • Go to Settings > Posts and comments  
  • Look for the "Showcase images with Lightbox" and select "No".


Save your Settings and you're done!
More aboutHow To Disable or Turn Off Lightbox View For Blogger Images

Blogger Auto Video Template by webbilgi

Posted by Unknown

Rate this template:

Demo: Click here for Demo

Source And Designer: Author page

Click here to Download


Features:
  • Automatic thumbnail creation for Youtube videos.
  • A picture similar to the articles.
  • Custom fields gadget.
  • Simplified design.
  • Dailymotion, metacafe, vimeo, LiveLeak, YouTube, to automatically embed videos
Usage:

  • For videos from, Dailymotion, metacafe, vimeo, LiveLeak, add the endofvid tag to the end of the link. 
  • For the video description: place the [starttext] and [endtext] code to the beginning and end of description.

Example:
http://www.dailymotion.com/video/xmpjro_yntikamyn-bedeli-seeking-justice-vizyonda_shortfilmsendofvid
[starttext]
this is description
[endtext]

The thumbnails for these video services are not available. You'll have to add pictures manually.

Youtube videos: When you add the iframe code, it automatically creates a thumbnail. Instructions:When creating a post, switch to Edit HTML tab and paste the embed code of youtube video in the HTML box.
You don't need to add any pictures.


Other: If thumbnails don't appear, find and delete the ?rel=0 code at the end of youtube URL.
More aboutBlogger Auto Video Template by webbilgi

Add a Popular Posts Gallery just above your Blogger posts

Posted by Unknown

The most strong and popular web design trend over last couple of years is a sliding horizontal panels also known as Sliders or Carousels. It's a very effective method to increase the web site usability and engage the user. This widget shows the most popular 10 posts on your blog just above your Blogger posts. You can see the Demo on my blog.
Let's start adding it

Before adding it you should know that this widget is not fully compatible with all templates, so please make a backup before making any changes to your blogger template. Now, follow these steps:

1. If you are using the old Blogger interface: 
  • Go to Dashboard - Design - Edit HTML - (make a backup) Expand Widget Template 
If you are using the new Blogger interface: 
  • Go to Dashboard - Template - Edit HTML - Proceed - (make a backup) Expand Widget Template
2. Search (CTRL + F) for this piece of code:

]]></b:skin>

3. Just above/before it, add the following code:

#gallery{position:relative;margin:0 35px 20px;width:590px;height:126px;background:#ffffff}
#gallery .belt{position:absolute;top:0;left:0;list-style-type:none}
#gallery .panel{float:left;margin:20px;width:84px;height:86px;background:url(https://blogger.googleusercontent.com/img/b/R29vZ2xl/AVvXsEhkS5u3J2oTzzIy3O7VjjKBC9Mv1kz6pZWZf-l5pK0QN4oImqPZrqKN2lI7_7HQo8NM3lxuRXrxkSaMlUqYhBBguMqTG_Kiw0rQatUIdxWdmoLQCD23ZmR8P5hDLz500XWVKvXcFQCVtQiU/s1600/bg-slider.png) bottom center no-repeat;overflow:hidden}
#gallery .panel img{float:left;border:1px solid #DDD;margin:5px;width:72px;height:72px;background:#FFF;padding:0px}
#gallery .panel img:hover{filter:alpha(opacity=50);-moz-opacity:0.5;-khtml-opacity:0.5;opacity:0.5}

Note: you can adjust the size of gallery, changing the values in red (590 and 126).

4. Now search for the following piece of code:

</head>


5. Just above/before it, add this code:

<script src='http://ajax.googleapis.com/ajax/libs/jquery/1.4.2/jquery.min.js' type='text/javascript'/>
<script src='http://fe-blogger.googlecode.com/svn/trunk/auto-slider.js' type='text/javascript'/>
<script type='text/javascript'>
//<![CDATA[
stepcarousel.setup({
galleryid: "gallery",
beltclass: "belt",
panelclass: "panel",
autostep: {enable:true, moveby:1, pause:6000},
panelbehavior: {speed:500, wraparound:true, persist:true},
defaultbuttons: {enable: true, moveby: 2, leftnav: ["https://blogger.googleusercontent.com/img/b/R29vZ2xl/AVvXsEiju2stNMSlPducWet4cE7h1bs19g_PBcO4pqe3Cv5-wFrXMwwOLxr-Fw0SiywNJ2lQVM1uA5B85zq-OhHau6mzoM8z3Unls1l6EPXMhfqR7pMKlgGNQ7DrDpuU0r-fdjd-2HiASiX4-Iw2/s1600/prev.png", -40, 36], rightnav: ["https://blogger.googleusercontent.com/img/b/R29vZ2xl/AVvXsEgIYsdCC2mMfOIqbZO_Hy3mneCS9aE5YUbfQ_faQElzAdXFEsEkuduaGeGTorBKj9JDxw2BnNED_DaoLB1mdzMCZOCZQdrb-srudjwGvT3UGh2HDULMa8nLN9H9OOOLw87wrf2v_htTtLiO/s1600/next.png", 2, 36]},
contenttype: ["external"]
})
//]]>
</script>

Next thing to do is to place the widget just above the blogger posts.

6. Search for this code:

<b:section class='main' id='main' showaddelement='yes'>

...or if you can'find it, search for this one:

<b:section class='main' id='main' showaddelement='no'>

7. Just below it, add the following code:

<b:widget id='PopularPosts2' locked='false' title='Popular Posts' type='PopularPosts'>
<b:includable id='main'>
<b:if cond='data:blog.url == data:blog.homepageUrl'>
<div style='margin-top:20px;margin-bottom:70px;margin-left:-20px;'>
  <div id='gallery'>
   <ul class='belt'>
    <b:loop values='data:posts' var='post'>
     <li class='panel'>
      <b:if cond='data:showThumbnails == &quot;false&quot;'>
       <b:if cond='data:showSnippets == &quot;false&quot;'>
        <a expr:href='data:post.href' expr:title='data:post.title' rel='bookmark'><data:post.title/></a>
       <b:else/>
        <div class='item-title'>
         <a expr:href='data:post.href' expr:title='data:post.title' rel='bookmark'><data:post.title/></a>
        </div>
        <div class='item-snippet'>
         <data:post.snippet/>
        </div>
       </b:if>
      <b:else/>
       <a expr:href='data:post.href' expr:title='data:post.title' rel='bookmark'>
        <b:if cond='data:post.thumbnail'>
         <img expr:alt='data:post.title' expr:src='data:post.thumbnail'/>
        <b:else/>
         <img alt='no image' src='https://blogger.googleusercontent.com/img/b/R29vZ2xl/AVvXsEiVxfMtiK_gU4Ej4JmRJCvXbRpmiehULMNjmUcy0KJKlyIuiKek4Zsay_fhPTY4RqLAQf_2v8kA7cSrNWm_yqgQA8EvEAH8l0SdBPIQ8SMd73l6_Ost0LzI6em5qhRgqg_JatS0amoxSrvv/s1600/no-image.PNG'/>
        </b:if>
       </a>
      </b:if>
     </li>
    </b:loop>
   </ul>
  </div></div></b:if>
 </b:includable>
</b:widget>

Note: delete the fragments of code in blue if you want this widget to be displayed in posts pages also.

8. Preview and if everything is ok, Save the Template.
More aboutAdd a Popular Posts Gallery just above your Blogger posts

Add Google Adsense to Blogger Header (Above the Title)

Posted by Unknown


In the past tutorials ( See: Social Media Buttons beside Adsense ads Adsense inside Blogger Header ) i've shared several tricks for Adsense ads placement that may help you to increase your adsense earnings. Now, i will show you how to add Google Adsense above your header, for instance just above the title of your Blogger blog. This can be done by adjusting your template to give you the option of adding more than one widget to the header area.

Add a new element to Blogger header

1. If you are using the old Blogger interface: 

  • Go to Dashboard - Design - Edit HTML - (make a backup) Expand Widget Template 

If you are using the new Blogger interface: 

  • Go to Dashboard - Template - Edit HTML - Proceed - (make a backup) Expand Widget Template 

2. Next try to find (CTRL + F) this piece of code:

<div id='header-wrapper'>

...if you can't find that one, search for this one:

<div class='region-inner header-inner'>

3. Immediately after one of these lines, you'll see this code:

<b:section class='header' id='header' maxwidgets='1' showaddelement='no'>

4. Replace the values in red like in this example below:

<b:section class='header' id='header' maxwidgets='3' showaddelement='yes'>

5. Save the Template.

Adding the Adsense ad unit above the Blogger header

1. Navigate to Design > Page Elements and view the new option to add a gadget to the header area


2. Click on Add a Gadget link and select the Google Adsense gadget.

Choose the type of ad unit you want. For this example I chose a new linked 728x15 ad unit from the dropdown format menu for an AdSense ad that would sit above the blog title. Configure colors if necessary. Color blending is usually done automatically by Blogger according to the color schema of your template.

3. Click Save

Now View your Blog to see your new Google Adsense unit. If all is going well, your new AdSense ad unit should appear something like in the image below:


This is a very good Adsense placement, i'm sure you're gonna like it

If you have a any questions, please feel free to ask below.
More aboutAdd Google Adsense to Blogger Header (Above the Title)

How to add an image next to Blogger Post Title

Posted by Unknown

blogger posts, gadgets for blogger, blogger tutorials

It has often been said that a picture says a thousand words, so in the struggle for the attention of the reader, we can add a picture or an icon to our post title, as I have put in the title of the post in the screenshot above.

Show Image Icon before Blogger Post Title

Step 1:

First thing first you have to do is to prepare an image. After that you'll need a direct link to an image before you proceed further. You can upload it to tinypic.com and copy the URL located in the Direct Link for Layouts box. Also, make sure your image is sized appropriately. You don't want to see a huge image next to your post title.

Step 2: Go to Dashboard - Template - Edit HTML - Proceed if needed
    Step 3. Click anywhere inside the code area to find (using CTRL + F) the following code:
    <b:includable id='post' var='post'>
    Step 4. After you found it, click on the left arrow next to it to expand the widget's code


    Step 5. Then delete it until you reach to <div class='post-header'>:
                  <b:includable id='post' var='post'>
      <div class='post hentry' itemprop='blogPost' itemscope='itemscope' itemtype='http://schema.org/BlogPosting'>
        <b:if cond='data:post.firstImageUrl'>
          <meta expr:content='data:post.firstImageUrl' itemprop='image_url'/>
        </b:if>
        <meta expr:content='data:blog.blogId' itemprop='blogId'/>
        <meta expr:content='data:post.id' itemprop='postId'/>

        <a expr:name='data:post.id'/>
        <b:if cond='data:post.title'>
          <h3 class='post-title entry-title' itemprop='name'>
          <b:if cond='data:post.link'>
            <a expr:href='data:post.link'><data:post.title/></a>
          <b:else/>
            <b:if cond='data:post.url'>
              <b:if cond='data:blog.url != data:post.url'>
                <a expr:href='data:post.url'><data:post.title/></a>
              <b:else/>
                <data:post.title/>
              </b:if>
            <b:else/>
              <data:post.title/>
            </b:if>
          </b:if>
          </h3>
        </b:if>
    The code to be deleted:


    Step 6:

    Paste the following code in the place of the deleted code in Step 5:
    <b:includable id='post' var='post'>
      <div class='post hentry' itemprop='blogPost' itemscope='itemscope' itemtype='http://schema.org/BlogPosting'>
        <b:if cond='data:post.firstImageUrl'>
          <meta expr:content='data:post.firstImageUrl' itemprop='image_url'/>
        </b:if>
        <meta expr:content='data:blog.blogId' itemprop='blogId'/>
        <meta expr:content='data:post.id' itemprop='postId'/>

        <a expr:name='data:post.id'/>
        <b:if cond='data:post.title'>
          <table><tr>
            <td class='posttitle'>
               <img src='IMAGE-URL'/></td>
            <td><h3 class='post-title entry-title' itemprop='name'>
          <b:if cond='data:post.link'>
            <a expr:href='data:post.link'><data:post.title/></a>
          <b:else/>
            <b:if cond='data:post.url'>
              <b:if cond='data:blog.url != data:post.url'>
                <a expr:href='data:post.url'><data:post.title/></a>
              <b:else/>
                <data:post.title/>
              </b:if>
            <b:else/>
              <data:post.title/>
            </b:if>
          </b:if>
          </h3>
            </td>
            </tr></table>
         
          <style>
            h3.post-title {
              margin: 0px !important;
            }
          </style>
       
        </b:if>

    Step 7:

    Replace the IMAGE-URL text in blue color from above with the URL address of your image (the one that you've gotten from Step 1).

    Step 8: Save the Template and that's it! Enjoy :)
    More aboutHow to add an image next to Blogger Post Title

    How to remove Blogger Picture/Image Shadow and Border

    Posted by Unknown

    If you want to get rid of those annoying shadows and borders around blogger images, then follow the next steps (see the difference in the screenshot below):
    If you are using the old Blogger interface:
    • Go to Dashboard - Design - Template Designer - Advanced - Add CSS - paste the following code - Press enter after the last character of the last line } - Apply to Blog.

    If you are using the new Blogger interface:
    • Go to Dashboard - Template - Customize - Advanced - Add CSS - paste the following code - Press enter after the last character of the last line } - Apply to Blog.

    .post-body img, .post-body .tr-caption-container, .Profile img, .Image img,
    .BlogList .item-thumbnail img {
      padding: none !important;
      border: none !important;
      background: none !important;
      -moz-box-shadow: 0px 0px 0px transparent !important;
      -webkit-box-shadow: 0px 0px 0px transparent !important;
      box-shadow: 0px 0px 0px transparent !important;
    }

    Now your blogger images should appear without any border or shadow. Cheers!

    Update:

    If the above method doesn't work for you, do the following:

    - Go to Blogger's Dashboard > Design (Layout) > Edit HTML
    - Thick the "Expand widget templates" checkbox;
    - Search (CTRL + F) for the following code:

      border: 1px solid $(image.border.color);

      -moz-box-shadow: 1px 1px 5px rgba(0, 0, 0, .1);
      -webkit-box-shadow: 1px 1px 5px rgba(0, 0, 0, .1);
      box-shadow: 1px 1px 5px rgba(0, 0, 0, .1);

    - Delete it and Save your template.
    More aboutHow to remove Blogger Picture/Image Shadow and Border

    Replace Older, Newer And Home Blogger links with an image or text

    Posted by Unknown

    Newer Post, Home and Older Post are links that appear on the bottom of the posts. When a visitor click on one of these links, they will take him to the page with the list of your previous posts.
    The number of the posts on these pages will be the same as the number of the posts on your main page.


    What we can do:

    A. Change the text of Newer, Older, Home links
    B. Place a picture beside them (a small icon, arrow, or whatever...)
    C. Add an image instead of the links

    So let's start customizing them...

    1. Log in to your Blogger Dashboard, go to Template > Edit HTML

    2. Click anywhere inside the code area and find - using CTRL + F keys - the following code:
        <b:if cond='data:newerPageUrl'>
          <span id='blog-pager-newer-link'>
          <a class='blog-pager-newer-link' expr:href='data:newerPageUrl' expr:id='data:widget.instanceId + &quot;_blog-pager-newer-link&quot;' expr:title='data:newerPageTitle'><data:newerPageTitle/></a>
          </span>
        </b:if>

        <b:if cond='data:olderPageUrl'>
          <span id='blog-pager-older-link'>
          <a class='blog-pager-older-link' expr:href='data:olderPageUrl' expr:id='data:widget.instanceId + &quot;_blog-pager-older-link&quot;' expr:title='data:olderPageTitle'><data:olderPageTitle/></a>
          </span>
        </b:if>

        <a class='home-link' expr:href='data:blog.homepageUrl'><data:homeMsg/></a>
    Or find in this code the following fragments which corresponds to each page links
    • <data:newerPageTitle/> represents Newer Posts link
    • <data:olderPageTitle/> represents Older Posts link
    • <data:homeMsg/> represents Home link

    Now change these fragments of codes as it follows:

    A. Change the text of Newer Posts, Older Posts and Home Links


    You need to REPLACE following parts in original code with ANY TEXT you like:
    • replace <data:newerPageTitle/> with, for example NEXT POST 
    • replace <data:olderPageTitle/> with, for example PREVIOUS POST
    • replace <data:homeMsg/> (only the first one) with, for example HOMEPAGE

      B. Place a picture beside Newer Posts, Older Posts and Home links


      Add the below code just at the beginning of each of the colored fragments of codes from step 2.
      <img src="URL Address"/>

      So it should look like this:
      <img src="URL Address"/><data:newerPageTitle/>
      Note: Replace URL Address text with the url address of the image you want to appear

      C. Replace Older Posts, Newer Posts and Home links with an image/picture


      You can place any kind of picture you want All you have to do is use this code for the pic:
      <img src="URL ADDRESS"/>
      ...just replace URL ADDRESS, with the URL of your hosted picture
      ...and in code, REPLACE the original link code for text with picture code
      • replace <data:newerPageTitle/> with the pic for newer (next) posts
      • replace <data:olderPageTitle/> with the pic for older (previous) posts
      • replace <data:homeMsg/> (only the first one) with the pic for homepage
      Screenshot
      blogger tricks, older posts, newer posts

      3. That's it! Preview and Save the Template.
      More aboutReplace Older, Newer And Home Blogger links with an image or text

      Add Static Facebook Pop Out Like Box with Smooth Jquery Hover Effect

      Posted by Unknown

      In this tutorial i will show you how to add a cool floating Facebook like widget for Blogger that slides to the left on mouseover. Demo: You can see a static facebook badge at the right side of this blog


      Adding Static Facebook Like widget on blogger

      Just follow the steps:

      1. Log in to your Blogger Dashboard, go to Design >> Edit HTML

      2. Check the "Expand Widget Templates" box

      3. Search (CTRL + F) for this tag:

      </head>

      4. Add the following code just before/above </head> tag:

      <script src="https://ajax.googleapis.com/ajax/libs/jquery/1.7.1/jquery.min.js"></script>

      5. Save the Template.

      6. Now go to Design >> Page Elements >> Add a new Gadget >> Choose HTML/JavaScript and in the HTML box, paste the code below:

      <style type="text/css">
      /*<![CDATA[*/
      #fbplikebox{display: block;padding: 0;z-index: 99999;position: fixed;}
      .fbplbadge {background-color:#3B5998;display: block;height: 150px;top: 50%;margin-top: -75px;position: absolute;left: -47px;width: 47px;background-image: url("https://blogger.googleusercontent.com/img/b/R29vZ2xl/AVvXsEj3NJMzGdEG817Bohno1fTWoDllF3caxxcEgGX_jSCN4cjlM-TbxSIF-43cGO0UyaTsJZyCX7gPuVZYKUdhjuKpVIQ1ZpUe-aMzHa3TU9aSMK-L65r74DRx3ojOIfC4SyUVbLANI55o2a8/s1600/vertical-right.png");background-repeat: no-repeat;overflow: hidden;-webkit-border-top-left-radius: 8px;-webkit-border-bottom-left-radius: 8px;-moz-border-radius-topleft: 8px;-moz-border-radius-bottomleft: 8px;border-top-left-radius: 8px;border-bottom-left-radius: 8px;}
      /*]]>*/
      </style>
      <script type="text/javascript">
      /*<![CDATA[*/
          (function(w2b){
              w2b(document).ready(function(){
                  var $dur = "medium"; // Duration of Animation
                  w2b("#fbplikebox").css({right: -250, "top" : 100 })
                  w2b("#fbplikebox").hover(function () {
                      w2b(this).stop().animate({
                          right: 0
                      }, $dur);
                  }, function () {
                      w2b(this).stop().animate({
                          right: -250
                      }, $dur);
                  });
                  w2b("#fbplikebox").show();
              });
          })(jQuery);
      /*]]>*/
      </script>
      <div id="fbplikebox" style="display:none;">
          <div class="fbplbadge"></div>
          <iframe src="http://www.facebook.com/plugins/likebox.php?href=YOUR-FACEBOOK-PAGE&amp;width=250&amp;height=250&amp;colorscheme=light&amp;show_faces=true&amp;border_color=%23C4C4C4&amp;stream=false&amp;header=false" scrolling="no" frameborder="0" style="border:none; overflow:hidden; width:250px; height:250px;background:#FFFFFF;" allowtransparency="true"></iframe>
      </div>

      7. Replace YOUR-FACEBOOK-PAGE text above with the URL of your facebook fan page.
      Also replace the : symbol in your URL with %3A and / with %2F

      For example, my facebook fan page is:

      http://www.facebook.com/pages/fe-blogger/120574614736021

      After replacing the characters above, your facebook fan page should look like this:
      http%3A%2F%2Fwww.facebook.com%2Fpages%2Ffe-blogger%2F120574614736021

      Other settings (optional):
      - to change the width and height of the facebook box, change the bolded values (250)
      - to change the background color of the facebook fan box, replace #FFFFFF with the hex code of your color (you can choose it from here)
      - if you want to change the color of the facebook badge (facebook button) replace this code #3B5998
      with your own.

      8. Now you can save your widget. Enjoy!

      Credit goes to Harish (way2blogging)
      More aboutAdd Static Facebook Pop Out Like Box with Smooth Jquery Hover Effect

      Amazing Examples To Customize Blockquote Style In Blogger/Blogspot

      Posted by Unknown

      Add awesome designs, backgrounds and CSS3 effects for displaying HTML, CSS and other codes in blogger posts using CSS and CSS3. Just follow these steps:

      Step 1. Go to design > Edit HTML > check the "Expand widget templates" box

      Step 2. Search for this piece of code:

      </head>

      Step 3. Just above it, paste the following code:

      <link href='http://fe-blogger.googlecode.com/svn/trunk/css/blockquotes/styles.css' rel='stylesheet' type='text/css'/>

      Step 4. Save the Template

      Now everytime you create a post, switch to Edit HTML tab, choose the syle you like and add the red codes below to the beginning and end of the text you want to quote. See the screenshot below:


      Here are the available designs:

      Example 1:

      Lorem ipsum dolor sit amet, consectetuer adipiscing elit, sed diam nonummy nibh euismod tincidunt ut laoreet dolore magna aliquam erat volutpat. Ut wisi enim ad minim veniam, quis nostrud exerci tation ullamcorper suscipit lobortis nisl ut aliquip ex ea commodo consequat. Duis autem vel eum iriure dolor in hendrerit in vulputate velit esse molestie consequat, vel illum dolore eu feugiat nulla facilisis at vero eros et accumsan et iusto odio dignissim qui blandit praesent luptatum zzril delenit augue duis dolore te feugait nulla facilisi. Nam liber tempor cum soluta nobis eleifend option congue nihil imperdiet doming id quod mazim placerat facer possim assum.

      <div class="code1"> YOUR TEXT HERE </div>

      Example 2

      Lorem ipsum dolor sit amet, consectetuer adipiscing elit, sed diam nonummy nibh euismod tincidunt ut laoreet dolore magna aliquam erat volutpat. Ut wisi enim ad minim veniam, quis nostrud exerci tation ullamcorper suscipit lobortis nisl ut aliquip ex ea commodo consequat. Duis autem vel eum iriure dolor in hendrerit in vulputate velit esse molestie consequat, vel illum dolore eu feugiat nulla facilisis at vero eros et accumsan et iusto odio dignissim qui blandit praesent luptatum zzril delenit augue duis dolore te feugait nulla facilisi. Nam liber tempor cum soluta nobis eleifend option congue nihil imperdiet doming id quod mazim placerat facer possim assum.

      <div class="code2"> YOUR TEXT HERE </div>

      Example 3:

      Lorem ipsum dolor sit amet, consectetuer adipiscing elit, sed diam nonummy nibh euismod tincidunt ut laoreet dolore magna aliquam erat volutpat. Ut wisi enim ad minim veniam, quis nostrud exerci tation ullamcorper suscipit lobortis nisl ut aliquip ex ea commodo consequat. Duis autem vel eum iriure dolor in hendrerit in vulputate velit esse molestie consequat, vel illum dolore eu feugiat nulla facilisis at vero eros et accumsan et iusto odio dignissim qui blandit praesent luptatum zzril delenit augue duis dolore te feugait nulla facilisi. Nam liber tempor cum soluta nobis eleifend option congue nihil imperdiet doming id quod mazim placerat facer possim assum.

      <div class="code3"> YOUR TEXT HERE </div>

      Example 4:

      Lorem ipsum dolor sit amet, consectetuer adipiscing elit, sed diam nonummy nibh euismod tincidunt ut laoreet dolore magna aliquam erat volutpat. Ut wisi enim ad minim veniam, quis nostrud exerci tation ullamcorper suscipit lobortis nisl ut aliquip ex ea commodo consequat. Duis autem vel eum iriure dolor in hendrerit in vulputate velit esse molestie consequat, vel illum dolore eu feugiat nulla facilisis at vero eros et accumsan et iusto odio dignissim qui blandit praesent luptatum zzril delenit augue duis dolore te feugait nulla facilisi. Nam liber tempor cum soluta nobis eleifend option congue nihil imperdiet doming id quod mazim placerat facer possim assum.

      <div class="code4"> YOUR TEXT HERE </div>

      Example 5:

      Lorem ipsum dolor sit amet, consectetuer adipiscing elit, sed diam nonummy nibh euismod tincidunt ut laoreet dolore magna aliquam erat volutpat. Ut wisi enim ad minim veniam, quis nostrud exerci tation ullamcorper suscipit lobortis nisl ut aliquip ex ea commodo consequat. Duis autem vel eum iriure dolor in hendrerit in vulputate velit esse molestie consequat, vel illum dolore eu feugiat nulla facilisis at vero eros et accumsan et iusto odio dignissim qui blandit praesent luptatum zzril delenit augue duis dolore te feugait nulla facilisi. Nam liber tempor cum soluta nobis eleifend option congue nihil imperdiet doming id quod mazim placerat facer possim assum.

      <div class="code5"><div class="code-5"> YOUR TEXT HERE </div></div>

      Example 6


      Lorem ipsum dolor sit amet, consectetuer adipiscing elit, sed diam nonummy nibh euismod tincidunt ut laoreet dolore magna aliquam erat volutpat. Ut wisi enim ad minim veniam, quis nostrud exerci tation ullamcorper suscipit lobortis nisl ut aliquip ex ea commodo consequat. Duis autem vel eum iriure dolor in hendrerit in vulputate velit esse molestie consequat, vel illum dolore eu feugiat nulla facilisis at vero eros et accumsan et iusto odio dignissim qui blandit praesent luptatum zzril delenit augue duis dolore te feugait nulla facilisi.

      <div class="code6"> YOUR TEXT HERE </div>


      Enjoy!
      More aboutAmazing Examples To Customize Blockquote Style In Blogger/Blogspot

      A Simple Related Posts Widget For Blogger

      Posted by Unknown

      In the last tutorial, i've been talking about the Related Posts widget that shows related posts along with thumbnails just at the end of your blog articles. Some of the users, however, would prefer a simpler and cleaner displaying of their related posts so that it would show just the posts titles. So let's begin adding it!

      related post, related post blogger, blogger tricks

      How to add Related Posts Widget to Blogger

      Step 1. Go to Template >> Edit HTML and tick the "Expand Widget Templates" checkbox

      Step 2. Find the below tag

      </head>

      Step 3. And just above it, paste the following code:


      <!--Related Posts Scripts and Styles Start-->
      <!--Remove--><b:if cond='data:blog.pageType == &quot;item&quot;'>
      <style type='text/css'>
      #related-posts {
      float:center;
      text-transform:none;
      height:100%;
      min-height:100%;
      padding-top:5px;
      padding-left:5px;
      margin-top: 20px;
      }
      #related-posts .widget{
      padding-left:6px;
      margin-bottom:10px;
      }
      #related-posts .widget h2, #related-posts h2{
      font-size: 17px;
      font-weight: normal;
      color: black;
      font-family: Arial Narrow;
      margin-bottom: 0.75em;
      padding-top: 0em;
      }
      #related-posts a{
      font-size:16px;
      color: #555555;
      font-variant:small-caps;
      }
      #related-posts a:hover{
      text-decoration: none;
      color: #ffffff;
      font-weight: bold;
      }
      #related-posts ul{
      list-style-type:none;
      margin:0 0 0px 0;
      padding:0px;
      text-decoration:none;
      text-color:#000000
      }
      #related-posts ul li{
      list-style-type: none;
      border-left: 2px solid #1399CF;
      border-bottom: 1px dotted #1399CF;
      margin-bottom: 3px;
      padding-left: 30px;
      padding-top:0px;
      }

      #related-posts ul li:hover{
      background-color: #1399CF;
      border-left: 2px solid #B3CA3D;
      border-bottom: 1px dotted #B3CA3D;
      }
      </style>
      <script type='text/javascript'>
      var relatedpoststitle=&quot;Related Posts&quot;;
      </script>
      <script src='http://fe-blogger.googlecode.com/svn/trunk/related_posts.js' type='text/javascript'/>
      <!--Remove--></b:if>
      <!--Related Posts Scripts and Styles End-->

      Note:
      - if you want to change the size and color of 'Related Posts' title, change the bolded values (17 for the font size and black for the color)
      -to change the related post title color, replace the value in red;
      -to change the background color on mouseover, replace the color value in blue;

      Step 4. Now find (CTRL + F) the below line:

          <div class='post-footer'>

      Step 5. Just above it, paste the code below:

      <!-- Related Posts Code Start-->
      <!--Remove-->
      <b:if cond='data:blog.pageType == &quot;item&quot;'>
      <div id='related-posts'> <b:loop values='data:post.labels' var='label'> <b:if cond='data:label.isLast != &quot;true&quot;'> </b:if> <b:if cond='data:blog.pageType == &quot;item&quot;'> <script expr:src='&quot;/feeds/posts/default/-/&quot; + data:label.name + &quot;?alt=json-in-script&amp;callback=related_results_labels&amp;max-results=6&quot;' type='text/javascript'/></b:if></b:loop>
      <script type='text/javascript'> var maxresults=5; removeRelatedDuplicates(); printRelatedLabels(&quot;<data:post.url/>&quot;); </script> </div> <!--Remove--></b:if> <!-- Related Posts Code End-->

      Note: In order to change the number of maximum related posts being displayed for each label, search for the code max-results=5 and change the number "5" to any desired number.

      Step 6. Save Template

      Enjoy!!!
      More aboutA Simple Related Posts Widget For Blogger