How to Add a Recent Forum Topics Widget to Blogger

Posted by Unknown

If you are using the Nabble forum in your blog is very likely that this gadget will interest you because, as the title says, it will show the lastest topics that have been published in your forum in a very similar manner to the recent comments gadget which uses the blog's feed.

nabble forum

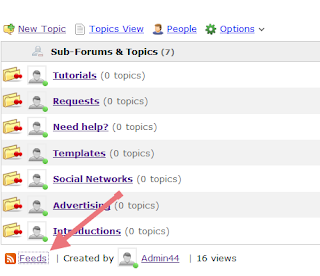
First you should go to your forum and look at the bottom where it says Feeds, click there, then two links of the Feed will appear (the first being the Topics only Feed and the other one is Topics and replies), choose the one you want.
using nabble feeds to see latest forum topics

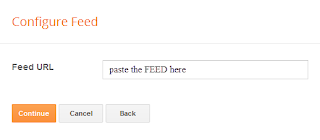
After this, log in to your Blogger Dashboard, go to Layout, click on Add a Gadget link, choose Feed from the gadgets list and paste the Feed URL you have selected inside the text box.

configure gadget feed in blogger

Click on Continue, and you only have to configure the parameters, then Save changes to see the results.

That's it! Enjoy :)
More aboutHow to Add a Recent Forum Topics Widget to Blogger

Add a forum on your Blogger blog with Nabble

Posted by Unknown

If you have many users on your blog and many comments, perhaps you should consider a forum to finish enriching your blog.
free embeddable forum with nabble

Create a Forum With Nabble


To implement a forum we will use Nabble, in my opinion, the best free option. We go to Nabble page and there, we will create an account (keep in mind that this account will be the moderator of the forum).

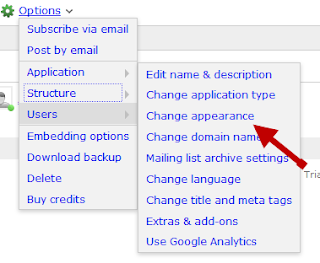
And once we have everything set (it also has a wide variety of customizing options), go to Options -> Application -> Change appearance:

nabble change appearance

There, we can also edit the CSS of the forum and other things...

Now we have to give the structure of a real forum, i.e. organizing it by categories. To do this click on the Options menu, select Application, then click Change application type:

nabble option change application type

Then choose the Forum category and save your changes.

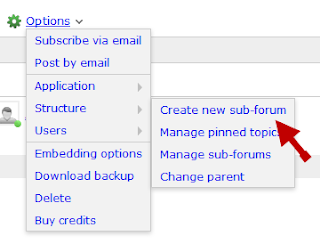
To finish, we only have to create categories and for this go back to Options, this time select Structure and then choose Create a new sub-forum:
nabble create new sub-forum

Fill in the details of the category and that's it, you will have your forum running.

The rest are small details, like sort categories (Options > Structure > Manage sub-forums), customize your avatar and your signature (YourNickname > Account Settings), change permissions (Options > Users > Permissions), etc..

Now for integrating the newly created forum to your blog, you must go to Options - Embedding options and copy the javascript code.
nabble forum embedding options

Embed the forum in a Blogger page


Go to your Blogger Dashboard and create a new Blank Page


Once there, get in the HTML mode.

Paste here the code that we copied earlier, and if everything went well, we should see our brand new forum for our blog!
create a forum for blogger with nabble

I hope this tutorial was helpful to you and you will begin using this great service.
More aboutAdd a forum on your Blogger blog with Nabble

Top Commentators Widget with Avatars for Blogger

Posted by Unknown

The commentators are a fundamental part of any blog, since they are the ones that give life to the blog, opening and replying to discussions which leads to more activity in the posts.
how to add top commenters widget to blogger

It is therefore very important to know which are the most active users of your blog, the users who leave more comments, and for this reason, today I present a great method to display a list with the top commentators.

The gadget will look something like this:

add top commentators widget to blogger

This Top Commentators gadget comes with user's avatar and is done with JavaScript.

How to Add the Top Commenters Gadget to Blogger


1. To add this gadget, you have to go to Layout, click on Add a Gadget link.

2. Select the HTML/JavaScript gadget and copy/paste within the empty box the following code:

<style type="text/css">
.top-commentators {
margin: 3px 0;
border-bottom: 1px dotted #ccc;
}
.avatar-top-commentators {
vertical-align:middle;
border-radius: 30px;
}
.top-commentators .commenter-link-name {
padding-left:0;
}
</style>
<script type="text/javascript">
var maxTopCommenters = 8;  
var minComments = 1;       
var numDays = 0;           
var excludeMe = true;      
var excludeUsers = ["Anonymous", "someotherusertoexclude"];   
var maxUserNameLength = 42;
//
var txtTopLine = '<b>[#].</b> [image] [user] ([count])';
var txtNoTopCommenters = 'No top commentators at this time.';
var txtAnonymous = '';
//
var sizeAvatar = 33;
var cropAvatar = true;
//
var urlNoAvatar = "https://blogger.googleusercontent.com/img/b/R29vZ2xl/AVvXsEgAl-k6OxiOfpF-GEkOFJRAT5-AmlsLnGweflGF2hAf1E-8N73vT-Z5dVdz0GGN0eBg6Pj4dEuXt0JQTMSBg5XefGoiy3vNsEDLSlre1jTiuZcmuRW3uwSN6MT4NvigS5H1TQWWVW39Bok6/s1600/avatar_blue_m_96.png" + sizeAvatar;
var urlAnoAvatar = 'https://blogger.googleusercontent.com/img/b/R29vZ2xl/AVvXsEjsqxsc5O8u1Y9-zQszpTq9LL2MBeZQpldiBpIXKwjHwLrJ6pi6al5GiUTnbQOrivcoWgq1gPXWRaLqOUuAx6BBKiJYJscFxQrxfjHQpetSpGGJy4coazfku9I2AZuHEL4OIeY-ELM6dAXw/s1600/avatar1.png' + sizeAvatar;
var urlMyProfile = '';
var urlMyAvatar = '';

if(!Array.indexOf) {
 Array.prototype.indexOf=function(obj) {
  for(var i=0;i<this.length;i++) if(this[i]==obj) return i;
  return -1;
}}
function replaceTopCmtVars(text, item, position)
{
  if(!item || !item.author) return text;
  var author = item.author;

  var authorUri = "";
  if(author.uri && author.uri.$t != "")
    authorUri = author.uri.$t;

  var avaimg = urlAnoAvatar;
  var bloggerprofile = "http://www.blogger.com/profile/";
  if(author.gd$image && author.gd$image.src && authorUri.substr(0,bloggerprofile.length) == bloggerprofile)
    avaimg = author.gd$image.src;
  else {
    var parseurl = document.createElement('a');
    if(authorUri != "") {
      parseurl.href = authorUri;
      avaimg = 'http://www.google.com/s2/favicons?domain=' + parseurl.hostname;
    }
  }
  if(urlMyProfile != "" && authorUri == urlMyProfile && urlMyAvatar != "")
    avaimg = urlMyAvatar;
  if(avaimg == "http://img2.blogblog.com/img/b16-rounded.gif" && urlNoAvatar != "")
    avaimg = urlNoAvatar;
  var newsize="s"+sizeAvatar;
  avaimg = avaimg.replace(/\/s\d\d+-c\//, "/"+newsize+"-c/");
  if(cropAvatar) newsize+="-c";
  avaimg = avaimg.replace(/\/s\d\d+(-c){0,1}\//, "/"+newsize+"/");

  var authorName = author.name.$t;
  if(authorName == 'Anonymous' && txtAnonymous != '' && avaimg == urlAnoAvatar)
    authorName = txtAnonymous;
  var imgcode = '<img class="avatar-top-commentators" height="'+sizeAvatar+'" width="'+sizeAvatar+'" title="'+authorName+'" src="'+avaimg+'" />';
  if(authorUri!="") imgcode = '<a href="'+authorUri+'">'+imgcode+'</a>';

  if(maxUserNameLength > 3 && authorName.length > maxUserNameLength)
    authorName = authorName.substr(0, maxUserNameLength-3) + "...";
  var authorcode = authorName;
  if(authorUri!="") authorcode = '<a class="commenter-link-name" href="'+authorUri+'">'+authorcode+'</a>';

  text = text.replace('[user]', authorcode);
  text = text.replace('[image]', imgcode);
  text = text.replace('[#]', position);
  text = text.replace('[count]', item.count);
  return text;
}

var topcommenters = {};
var ndxbase = 1;
function showTopCommenters(json) {
  var one_day=1000*60*60*24;
  var today = new Date();

  if(urlMyProfile == "") {
    var elements = document.getElementsByTagName("*");
    var expr = /(^| )profile-link( |$)/;
    for(var i=0 ; i<elements.length ; i++)
      if(expr.test(elements[i].className)) {
        urlMyProfile = elements[i].href;
        break;
      }
  }

  if(json && json.feed && json.feed.entry && json.feed.entry.length) for(var i = 0 ; i < json.feed.entry.length ; i++ ) {
    var entry = json.feed.entry[i];
    if(numDays > 0) {
      var datePart = entry.published.$t.match(/\d+/g);
      var cmtDate = new Date(datePart[0],datePart[1]-1,datePart[2],datePart[3],datePart[4],datePart[5]);
     
      var days = Math.ceil((today.getTime()-cmtDate.getTime())/(one_day));
      if(days > numDays) break;
    }
    var authorUri = "";
    if(entry.author[0].uri && entry.author[0].uri.$t != "")
      authorUri = entry.author[0].uri.$t;

    if(excludeMe && authorUri != "" && authorUri == urlMyProfile)
      continue;
    var authorName = entry.author[0].name.$t;
    if(excludeUsers.indexOf(authorName) != -1)
      continue;

    var hash=entry.author[0].name.$t + "-" + authorUri;
    if(topcommenters[hash])
      topcommenters[hash].count++;
    else {
      var commenter = new Object();
      commenter.author = entry.author[0];
      commenter.count = 1;
      topcommenters[hash] = commenter;
    }
  }
  if(json && json.feed && json.feed.entry && json.feed.entry.length && json.feed.entry.length == 200) {
    ndxbase += 200;
    document.write('<script type="text/javascript" src="http://'+window.location.hostname+'/feeds/comments/default?redirect=false&max-results=200&start-index='+ndxbase+'&alt=json-in-script&callback=showTopCommenters"></'+'script>');
    return;
  }

  // convert object to array of tuples
  var tuplear = [];
  for(var key in topcommenters) tuplear.push([key, topcommenters[key]]);

  tuplear.sort(function(a, b) {
    if(b[1].count-a[1].count)
        return b[1].count-a[1].count;
    return (a[1].author.name.$t.toLowerCase() < b[1].author.name.$t.toLowerCase()) ? -1 : 1;
  });

  var realcount = 0;
  for(var i = 0; i < maxTopCommenters && i < tuplear.length ; i++) {
    var item = tuplear[i][1];
    if(item.count < minComments)
        break;
    document.write('<di'+'v class="top-commentators">');
    document.write(replaceTopCmtVars(txtTopLine, item, realcount+1));
    document.write('</d'+'iv>');
    realcount++;
  }
  if(!realcount)
    document.write(txtNoTopCommenters);
}
document.write('<script type="text/javascript" src="http://'+window.location.hostname+'/feeds/comments/default?redirect=false&max-results=200&alt=json-in-script&callback=showTopCommenters"></'+'script>');
</script>

3. Now you just have to save changes and you're done!

Configuration


- To modify the number of users displayed in the gadget, look for var maxTopCommenters = 8; and change 8 with any number you want.
- To change the avatar size of the commenters, look for var sizeAvatar = 33; and change number 33 with the number of pixels you want.
More aboutTop Commentators Widget with Avatars for Blogger

Redirect Blogger 404 Error (Page Not Found) To Homepage

Posted by Unknown

Whenever, by mistake, we or a user misspells an URL inexistent in our blog, it automatically redirects to the 404 error page (page not found). A message like this would appear:

"Sorry, the page you were looking for in this blog does not exist."

how to redirect blogger 404 error to homepage
And probably this will not make a good impression on the greatest potential users of our blog. Before the user clicks the back button or close the window/browser's tab, thus leaving our site forever, we may want to redirect 404 error in Blogger to a page, where are chances that the visitor will continue reading our blog.

One of the most used methods is the "meta refresh" but the problem with this method is that it breaks navigation (doesn't allow returning back). In this case, the best method is by using Javascript which will be shown below.

Redirect Blogger 404 Error with Javascript


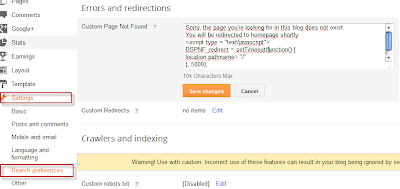
First of all, go to your Blogger dashboard and then to Settings > Search preferences > Custom Page Not Found.

redirect 404 error page in blogger to homepage

Copy and paste the following code:
Sorry, the page you're looking for in this blog does not exist.
You will be redirected to homepage shortly.
<script type = "text/javascript">
BSPNF_redirect = setTimeout(function() {
location.pathname= "/"
}, 5000);
</script>
The message which is going to be displayed can be edited as you want. If you are willing to redirect your blog 404 error page to another page other than your home page, just replace pathname to href and / with the url of your page. And finally, the number 5000 is the delay expressed in milliseconds. You can edit any value if this is more convenient.

Next thing to do is to save all changes made in this section and do a little test to check if the code works well. You can enter a nonexistent URL on your blog, and see if the 404 error page added previously appears, followed by a redirection after 5 seconds. That's it!
More aboutRedirect Blogger 404 Error (Page Not Found) To Homepage

4 Alternatives to Google AdWords

Posted by Unknown

Many think that Google AdWords is the only tool dedicated and available to perform a study such as a keyword search, but it isn't so, today I refute this little lie by collecting some alternatives that, although are not equal to Google AdWords, at least encourage us to make good keyword analysis for the SEO of our website.
alternatives to google adwords

Going back a bit, for those unfamiliar with the main features and tools of Google AdWords, we can find a very simple interface yet complete in every sense.
  • AdWords appearance has changed, however there is a chance of returning to the old design.
  • Allows you to place a phrase or keyword, a web site and use the categories.
  • For a better keywords search, you can apply filters such as location, language and add custom fields (competition, local or global monthly searches, CPC, Ad share, etc.).
  • Displays keyword ideas in columns with the amount of local and global monthly searches and approximate CPC.
  • You can download keyword ideas, search results in a format to open with Excel.

Having recalled and refreshed the memory a little with the characteristics of AdWords, now it is time to learn about other options both free and paid.

Google AdWords Alternatives


Bing Webmaster Tools: Bing may not be the tool that we had first thought of, however it wants to provide the best conditions for studying keywords.


After we register, to access the tool, go to Diagnostics & Tools and click on the second option on the list: Keyword Research.

SEMRush: Other freemium alternative that displays a very complete report of a particular keyword or website. However, it has limitations and if you opt for a PRO recurring plan you need to pay a monthly membership from $69.95 per month.

Ubersuggest: This nice and simple online tool searches keywords suggestion as well as potential titles for an article. Personally, I recommend it 100%.

Keyword Eye: If you are looking to perform a keyword research on a particular region, Keyword Eye will be your help. It also has the option of requesting the display of search volume or AdWords competition and a full report of anchor text, keywords and domain.

At first it offers a free plan with limitations and to enjoy all other benefits we have to pay $9.99 per month.
More about4 Alternatives to Google AdWords

How to Add Google Analytics to Blogger

Posted by Unknown

Google Analytics is a platform created with the purpose of providing us a tracking of the number of visits and page views on our blog that also uses several filters to check exactly from where visitors are coming via standard or custom reports.

Google Analytics is the leading free tool that has a good relationship with the internet marketing and offers suggestions and improvements or benefits for our website.

google analytics

As Analytics is part of the variety of Google tools like Blogger, many bloggers still don't know if it is possible to add the tracking code in Blogger. Implementing analytics in Blogger is very quick and easy, so you don't need to be experts or web developers, here's a small guide for placing the Google Analytics tracking ID on our blog.

Implementing Google Analytics on Blogger


1. Do you have a Google Analytics account? Then it's perfect. If you don't have one, please Register.
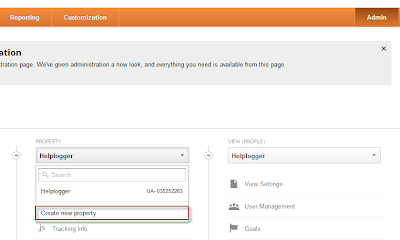
2. Within the account, we'll go to Admin and in the Property column, click the menu, then click Create new property, where we enter the information from the website.

create new property in google analytics

3. Click on "Get Tracking ID" and it will provide a box with a code, select and copy the code (CTRL + C).

get google analytics tracking id

4. Now let's go to our Blogger account.
5. Look for your blog and in the Template > Edit HTML, paste the code previously generated in Analytics before the </head> tag (CTRL + F in order to find it).

And this would be the entire procedure. And within about 24 hours, we shall see the first statistics of our blog in Google Analytics, otherwise do the following:

- Double check that the code has no spaces or characters.
- Errors in the configuration.
- Poor implementation of the filters.
- The Flash plugin is not working or javascript is disabled.
- Will have minor issues if you are receiving visits from China (this conflict is not yet solved, according to Google).
More aboutHow to Add Google Analytics to Blogger

How to Increase Alexa Ranking of your Blog

Posted by Unknown

The Alexa Rank in its time had a good importance for the SEO, however, these days is already losing its importance due to the changes in the algorithm that Google applies from time to time.
boost alexa rank

The network displays information about visitors of a website, which in turn classifies this in a ranking, also generates an estimated statistics about visitor traffic and links pointing to the website.

In a few words, the Alexa Rank does not directly affect SEO, but rather serves as a reference for measuring the traffic type, popularity by country and other metrics, although some companies that have a ranking below 100,000, whose purpose is to make room for their business are carried away by the web site.

For others more skeptical, the Alexa Rank is an essential part for search engine optimization and I will not contradict them, since everyone has their opinion on this aspect. If you would like to enrich or have a good Alexa Rank of your website, here I present some ways to do it and with short-term results.

how to improve alexa rank

5 Ways to Increase the Alexa Rank


Daily Content: Try to publish at least 2 articles per day and within a month you will start to notice changes in alexa ranking, guaranteed.

Install Alexa Rank widgets: Besides notifying about the results of your alexa ranking, it also makes an estimation of the backlinks to your website. There are three types of widgets: button with ranking and links, the other one with the ranking only and finally a graph with daily records of visits. Traffic Widgets

Alexa Toolbar: From experience, I highly recommend installing the Alexa Toolbar, because when we access a website alexa takes it as important visit and thus better results in the ranking. And of course, it will give you information about the links of a web site, popular pages, reviews, and more features.

Request a review: To calculate the alexa ranking of a website, besides taking the amount of daily and monthly visits, the number of reviews or opinions made with stars also play a role in the ranking. Ask your users or purchase alexa opinions about your website.

Number of backlinks: As I said earlier, the number of visits and reviews about your website used to calculate the alexa rank, the total number of quality backlinks increase more the chances of achieving favorable ranking for your website.
More aboutHow to Increase Alexa Ranking of your Blog

On-Page SEO Tips for Blogger

Posted by Unknown

We know that SEO Off Page is all the optimization that can be done off the page, such as link wheels, reviews, social bookmarking, social media (references and followers), sidebar links, among other techniques.
seo on-page optimization for blogger
However, is useless optimizing outside the website, if within is not created the same process, this mostly because the search engines (especially Google) pay much attention to alt and title tags (for images), meta tags, internal links, robots and so on, in order to display the content of your web page to the user who made a specific query in the search.

It all sums up to a non-optimized webpage without quality, so that it will not reach the traffic expected to have.

To never fall in this depression of search engine optimization, you can choose a good and reliable blog platform like Blogger, which is not like WordPress, but has similar characteristics. If you are working only on Blogger, today I will show you several really good tips to optimize SEO On Page on Blogger and become successful in daily visits as Internet popularity.

Important On-Page SEO Tips For Blogger


Implementation of the robots.txt file: besides alerting Google search engine, this file also helps us to prevent certain pages being indexed by Google in order to protect our blog against duplicate content issues.

Title optimization: In the default blogger template, post titles are not optimized properly for the search engines. To solve this, we need to touch some code in the design and optimize both page and post titles.

Image optimization: Whether your blog is about pictures or images as general topics, by simply placing a keyword related to articles, by compressing the image and placing the title=”" and alt=”", we would be optimizing SEO On Page a bit more.

Internal links: Internal links within posts on our website will not only increase page views, it will also help us to be well ranked in search engines.

Blog's loading time: When you start with a blog either new or old, is important to offer a user experience filled with a fast loading time without saturation of objects. Search engines give higher priority to a faster blog than to a slow or saturated one.

Using Google Webmaster Tools: After making sure that your blog is 100% SEO, this amazing Google tool will provide you support with both fast indexing and broken links, HTML improvements, page errors and many other specific suggestions for your website.

Got any other ideas or thoughts about natural and positive techniques to improve the On Page SEO on a web page?

Express them in a comment!
More aboutOn-Page SEO Tips for Blogger

Adding a Meta Description to Blogger

Posted by Unknown

An important part of a good SEO is the incorporation of meta tags, which are commonly located in the header of our website and which, in the same time, are invisible to users visiting the site. Well, to be more succinct, these tags have only one purpose: to include information about the page such as author name, date, key word, description, title, among others.

However, here we will only mention one, which is the meta description in Blogger, this description will appear as a fragment in the search results and as a description when sharing on Google+, Facebook and other social networks. A clear and precise description increases the chances of getting visits or clicks.

As we will work only on the Blogger platform, here I leave a little guide to easily add a meta description.

Meta Description in Blogger


The first thing we will do is going to our Blogger dashboard and go to Settings > Search preferences > Meta Tags > Description and click on Edit.

meta description

Then check the box "Yes" to enable search description and finally click on the "Save Changes" button.

Adding Meta Description To individual Posts


Now we will focus on adding the meta description to individual pages. Simply edit the page or post, look for the Search Description setting, where we enter the text and then save by clicking on the Done button.


You are ready, however it is best to test if it works and we will do so with the MetaChecker online tool, where we only have to introduce the url of a post or page, click Analyze and then it will show the results, including a complete analysis of keywords, on-page seo , meta tags, URLs, current server status and a rating bar that goes from Horror to Excellent.

If none of the meta descriptions appear (rarely fails), we will do the process manually, but it requires us to touch a bit of code. In this case, go to Template > Edit HTML and then insert before <b:skin><![CDATA[ the following code:
<b:if cond='data:blog.metaDescription != &quot;&quot;'>
  <meta expr:content='data:blog.metaDescription' name='description'/>
</b:if>
And, of course, we will use again the previously mentioned tool to ensure that the description is placed correctly and if all goes well, your blog would already be ready to face a good SEO.
More aboutAdding a Meta Description to Blogger

Multi colored random posts Widget for Blogger EXCLUSIVE.!!!!

Posted by Unknown

Multi colored random posts Widget for Blogger
Random Posts widget is an awesome widget for your Blogger Blog.We posted about How to add random posts widget, Most important feature of this widget is it lets your Blog visitors to surf more blog posts in your blog.Its let your users to spend more time in your Blog. Surely it increases your Blog's internal links that lets your blog higher traffic.This is the modified version of the Random posts widget we posted earlier, one of our visitor "Yogesh Gamer" asked me to make this widget like Multi colored Popular posts Widget. So after that I just tried and it got success. Please do check this widget and comment your suggestions...


Check out Related Articles
Awesome Random Posts Widget For Blogger
Awesome Multi-Colored Popular Posts Widget for Blogger

Features of This Widget

  •  Flat UI colors used (it will attract users attention)
  • Automatic Post Numbering

  • Sign In to Blogger Dashboard
  • Go to Layout
  • Click on Add Gadget and look for HTML/Javascript and select it
  • Copy the below code inside it and click save
<style type="text/css">
.noop-random-posts ul li {
    list-style-image:none;
}.noop-random-posts ul {
list-style-type: none;
margin: 0;
padding: 5px 0;
}
.noop-random-posts ul li {
border: 0 none;
margin: 5px 0;
padding: 10px;
position: relative;
}
.noop-random-posts ul li:first-child {
background: none repeat scroll 0 0 #FF4C54;
width: 97%;
}
.noop-random-posts ul li:first-child:after {
content: "1";
}
.noop-random-posts ul li:first-child + li {
background: none repeat scroll 0 0 #FF764C;
width: 87%;
}
.noop-random-posts ul li:first-child + li:after {
content: "2";
}
.noop-random-posts ul li:first-child + li + li {
background: none repeat scroll 0 0 #FFDE4C;
width: 84%;
}
.noop-random-posts ul li:first-child + li + li:after {
content: "3";
}
.noop-random-posts ul li:first-child + li + li + li {
background: none repeat scroll 0 0 #C7F25F;
width: 81%;
}
.noop-random-posts ul li:first-child + li + li + li:after {
content: "4";
}
.noop-random-posts ul li:first-child + li + li + li + li {
background: none repeat scroll 0 0 #33C9F7;
width: 78%;
}
.noop-random-posts ul li:first-child + li + li + li + li:after {
content: "5";
}
.noop-random-posts ul li:first-child + li + li + li + li + li {
background: none repeat scroll 0 0 #7EE3C7;
width: 75%;
}
.noop-random-posts ul li:first-child + li + li + li + li + li:after {
content: "6";
}
.noop-random-posts ul li:first-child + li + li + li + li + li + li {
background: none repeat scroll 0 0 #F6993D;
width: 72%;
}
.noop-random-posts ul li:first-child + li + li + li + li + li + li:after {
content: "7";
}
.noop-random-posts ul li:first-child + li + li + li + li + li + li + li {
background: none repeat scroll 0 0 #F59095;
width: 69%;
}
.noop-random-posts ul li:first-child + li + li + li + li + li + li + li:after {
content: "8";
}
.noop-random-posts ul li:first-child + li + li + li + li + li + li + li + li {
background: none repeat scroll 0 0 #C7F25F;
width: 66%;
}
.noop-random-posts ul li:first-child + li + li + li + li + li + li + li + li:after {
content: "9";
}
.noop-random-posts ul li:first-child:after, .noop-random-posts ul li:first-child + li:after, .noop-random-posts ul li:first-child + li + li:after, .noop-random-posts ul li:first-child + li + li + li:after, .noop-random-posts ul li:first-child + li + li + li + li:after, .noop-random-posts ul li:first-child + li + li + li + li + li:after, .noop-random-posts ul li:first-child + li + li + li + li + li + li:after, .noop-random-posts ul li:first-child + li + li + li + li + li + li + li:after, .noop-random-posts ul li:first-child + li + li + li + li + li + li + li + li:after {
background: none repeat scroll 0 0 #353535;
border-radius: 50% 50% 50% 50%;
color: #FFFFFF;
font-size: 25px;
height: 30px;
position: absolute;
right: -17px;
text-align: center;
top: 1px;
width: 30px;
}
.noop-random-posts ul li a {
color: #444444;
font-size: 13px;
text-decoration: none;
}

</style>
<div class="noop-random-posts"><script type="text/javascript">
    var randarray = new Array();var l=0;var flag;
    var numofpost=5;function nooprandomposts(json){
    var total = parseInt(json.feed.openSearch$totalResults.$t,10);
    for(i=0;i < numofpost;){flag=0;randarray.length=numofpost;l=Math.floor(Math.random()*total);for(j in randarray){if(l==randarray[j]){ flag=1;}}
    if(flag==0&&l!=0){randarray[i++]=l;}}document.write('<ul>');
    for(n in randarray){ var p=randarray[n];var entry=json.feed.entry[p-1];
    for(k=0; k < entry.link.length; k++){if(entry.link[k].rel=='alternate'){var item = "<li>" + "<a href=" + entry.link[k].href + ">" + entry.title.$t + "</a> </li>";
    document.write(item);}}
    }document.write('</ul>');}
    </script><a href="http://fe-blogger.blogspot.com" style="font-size:0pt">Blogger Widgets</a>
<script type="text/javascript" src="/feeds/posts/default?alt=json-in-script&start-index=1&max-results=1000&callback=nooprandomposts"></script></div>


More aboutMulti colored random posts Widget for Blogger EXCLUSIVE.!!!!