
You can get this tool from here

Posted by Unknown
Posted by Unknown

/atom.xml?redirect=false&start-index=1&max-results=500
/atom.xml?redirect=false&start-index=501&max-results=500
/atom.xml?redirect=false&start-index=1001&max-results=500
atom.xml?redirect=false&start-index=1001&max-results=500
atom.xml?redirect=false&start-index=1501&max-results=500
atom.xml?redirect=false&start-index=2001&max-results=500
atom.xml?redirect=false&start-index=2501&max-results=500
atom.xml?redirect=false&start-index=3001&max-results=500
Posted by Unknown


<head>
Posted by Unknown


Posted by Unknown

date.header
.date-header
background:white;
border-bottom: 1px solid #000000;
font-size:12px;
margin-left:-105px;
padding:3px 3px 3px 3px;
width:90px;
word-wrap:break-word;
float:left;
}
.date-header span {
background:#FFD465;
border-bottom: 2px solid #cc0000;
color:#000000;
font-size:12px;
margin-left:-105px;
padding:3px 3px 3px 3px;
width:90px;
word-wrap:break-word;
float:left;}
color: #0000cc;
Posted by Unknown


<div class='post-header-line-1'>
<div class='post-header'>
<font style='background:transparent url(https://blogger.googleusercontent.com/img/b/R29vZ2xl/AVvXsEi8J0dpK_J8q86NDuI-YsvsA7zC6rKZO4P3_afdDNNB2nh0nlTBoRUGrDf-SiNL3peWwhhfHkpSPI11_q2OgbwjjXV3aWvksgOme05EvXM30tnYJOJHLmw3PSHk1RhgVHK1qgOaXyZpNClD/s1600/author.gif) no-repeat scroll top left;padding-left:25px;font-size:11px;'><data:post.author/></font> | <font style='background:transparent url(https://blogger.googleusercontent.com/img/b/R29vZ2xl/AVvXsEj9xklFs37gyVKS0b5xKkm8804baFI1goTlD102WkPmbODlFb1dtWr6fIMceSTVJgNHOjuTXh2_tc2WYTUrGa7XE6GzkaDfbZ4uOMeq9QAexNlTav8Okl0hJQnFU2VPhR78_3uYTHlwODWE/s1600/clock_icon.gif) no-repeat scroll top left;padding-left:25px;font-size:11px;'><data:post.timestamp/></font> | <font style='background:transparent url(https://blogger.googleusercontent.com/img/b/R29vZ2xl/AVvXsEjRc6KvJnSPiU-Ds4Ie-SwSVRFSEKlXgWKD9fUFByIYRaQdjsobJhC98GytZlIhV8FMrVLSyKM4Et1OAmRx88D3j3e7CyzZ9qdn5igx9FR0FcmUNNis2BUoR0MPEq56Y11OfwbKUtU1FAcV/s1600/tag+icon.gif) no-repeat scroll top left;padding-left:25px;font-size:11px;'><b:if cond='data:post.labels'>
<b:loop values='data:post.labels' var='label'>
<a expr:href='data:label.url + "?max-results=8"' rel='tag'><data:label.name/></a>
<b:if cond='data:label.isLast != "true"'>|</b:if>
</b:loop>
</b:if></font>
<span class='post-comment-link' style='Float:right;'>
<b:if cond='data:blog.pageType != "item"'>
<b:if cond='data:post.allowComments'>
<a class='comment-link' expr:href='data:post.addCommentUrl' expr:onclick='data:post.addCommentOnclick' style='background:url(https://blogger.googleusercontent.com/img/b/R29vZ2xl/AVvXsEja9H4Ncuw_c6iDQsXb9TBuKhwF13ZQFPZqOfPItX-jyc7tJo43Az68cOmAWfR953LqRKi_TxWg6AQe_mjrGYh6RRa6AUO_LTdowaC6lXp6BWMqqAO0nRnKeJ0Kvk2-lB4EU4LxPpWTo1wa/s1600/comment-icon.png) no-repeat;Padding-left:20px;'><b:if cond='data:post.numComments == 0'>Be the first to comment!<b:else/> <b:if cond='data:post.numComments == 1'><data:post.numComments/> Comment so far<b:else/><data:post.numComments/> Comments so far</b:if> </b:if></a>
</b:if>
</b:if>
</span>
Posted by Unknown


<b:if cond='data:post.labels'>
<data:postLabelsLabel/>
<b:loop values='data:post.labels' var='label'>
<a expr:href='data:label.url' rel='tag'><data:label.name/></a><b:if cond='data:label.isLast != "true"'>,</b:if>
</b:loop>
</b:if>
Posted by Unknown


Posted by Unknown

<script src='http://ajax.googleapis.com/ajax/libs/jquery/1.7.1/jquery.min.js' type='text/javascript'/>
Posted by Unknown

<div class="noopdynamic">
Click this for change the view to Dynamic views</div>
<a href="/view">
<img class="noopdynamicimg" src="https://blogger.googleusercontent.com/img/b/R29vZ2xl/AVvXsEjQuJXXHqxAPcXvS3nwVblPKrK2pDt9kHztB_aF7ouo76ZEEkBiXcTepEouuE6GZcETyCrGoYbIFLx-djfPdg0U5uzJh9S5lUbglth0ff_bSIZ7DUcUgrTizIoHtX97KhLWrSCzoY06w0U/s1600/google+dynamic+views.jpg" /></a>
<style type="text/css">
.noopdynamicimg{bottom: 2%;
position: fixed;
right: 1%;}
.noopdynamic {background: -moz-linear-gradient(top, #aebcbf 0%, #6e7774 50%, #0a0e0a 51%, #0a0809 100%); background: -webkit-linear-gradient(top, #aebcbf 0%, #6e7774 50%, #0a0e0a 51%, #0a0809 100%);
background-color:#ABABAB;
border: 2px solid;
border-radius: 6px 6px 6px 6px;
bottom: 13%;
padding: 4px;z-index:999;
position: fixed;
right: 5%;
font:18px Arial;
text-shadow: 1px 1px 0 #FFFFFF;
width: 21%;
box-shadow:0 0 5px;
}
</style>
<script type="text/javascript">
$(function(){
$(".noopdynamic").hide(0);
$(".noopdynamicimg").hover(function(){
$(".noopdynamic").show("slow");
},function(){$(".noopdynamic").hide("medium");
});});
</script>
Posted by Unknown

If you want a cool static clock,then first do the step above and Click HERE
<style type="text/css">.noop-clock {
position: fixed;
right: 0%;
top: 0%;
padding: 3px 7px;
box-shadow: -2px 2px 6px;
}</style>
Posted by Unknown
According to Google’s new privacy policy it will centralize all your data or personal information and one service of Google can use your personal data related to another service.
Posted by Unknown

Posted by Unknown


Posted by Unknown
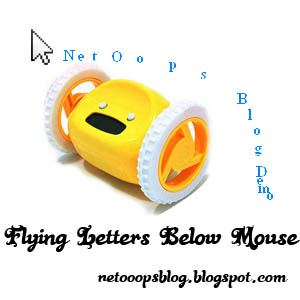
<script type="text/javascript">
var text=' ENTER YOUR FLYING TEXT HERE ';
</script>
<script src="http://netoopscodes.googlecode.com/svn/branches/Js%20files/mousetail.js" type="text/javascript">
</script>
Posted by Unknown

Posted by Unknown
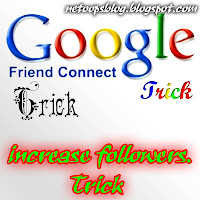
<a href="http://www.blogger.com/follow-blog.g?blogID=PLACE YOUR BLOG ID HERE" target="_blank" title="Follow With Google Friend Connect"><img border="0" src="https://blogger.googleusercontent.com/img/b/R29vZ2xl/AVvXsEi954txGq7Zr19DmJMtgWYjRX6B4SfZuNDx6TULZCfB_kiMZutE9p1r6zbo0E7fw78el3Hez58Lht6pQsatdLaL2nst2mM9NcaBFrndrIY2b8afSaoqMc0e1MYjAiC1TFRihHlQh-XLG6g/s1600/google+friend+connect+netoops.jpg" /></a>
Preview
<a href="http://www.blogger.com/follow-blog.g?blogID=PLACE YOUR BLOG ID HERE" target="_blank" title="Follow With Google Friend Connect"><img border="0" src="https://blogger.googleusercontent.com/img/b/R29vZ2xl/AVvXsEjhK5RrTL8mPSWDz0HbA6S7gkZiyB6Wmyq6OS9FPTALY3mXDKFkNz4PAXbAzz15wN1ddu09q-_hJxJZ1SJsFMMX7C1HL4L11nzUmE0xHFasuV1VtSaWXtOXJlXrMx82w0uge8XRKTPO7rU/s1600/google+friend+connect+style.jpg" /></a>
Preview
<a href="http://www.blogger.com/follow-blog.g?blogID=PLACE YOUR BLOG ID HERE" target="_blank" title="Follow With Google Friend Connect"><img border="0" src="https://blogger.googleusercontent.com/img/b/R29vZ2xl/AVvXsEgQ92KQfqlNT-s8hft-d-JXJv5Q9Jvu9iwPt9Lf6I7jzztL0zA9eSRzFvO_0Z5ilm0kf8XEfy5fan48p7BMrdCWnG9_zL9A1lgRfqyhOTnez4twjMMUAxPVjvdiPX6Gc9S8bemsqzSfKjw/s1600/google+friend+connect+style2+netoops.jpg" /></a>
Preview
<a href="http://www.blogger.com/follow-blog.g?blogID=PLACE YOUR BLOG ID HERE" target="_blank" title="Follow With Google Friend Connect"><img border="0" src="https://blogger.googleusercontent.com/img/b/R29vZ2xl/AVvXsEgbaJjxcxWMbzPpc861k9N1xEBPPCJa9tBnMFHvJwA-9pqgcnHjcvsR4xL_Lkbq4khZR3-T5mo9iYHi9FTTlR9Z5_WW2_af8VBPvzXmhhSFSFEvAY4c9GkS11EluEJMmDmQvX_XXvOoZW0/s1600/google+friend+connect+style3+netoops.jpg" /></a>
Preview

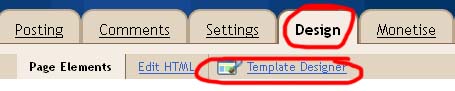
<b:if cond='data:pageType == "item"'>PLACE THE CODE OF FOLLOW BUTTON YOU WANT (that described above)<.b:if>
Example:<b:if cond='data:blog.url == "item"'>
<a href="http://www.blogger.com/follow-blog.g?blogID=585509540650265660" target="_blank" title="Follow With Google Friend Connect"><img border="0" src="https://blogger.googleusercontent.com/img/b/R29vZ2xl/AVvXsEgbaJjxcxWMbzPpc861k9N1xEBPPCJa9tBnMFHvJwA-9pqgcnHjcvsR4xL_Lkbq4khZR3-T5mo9iYHi9FTTlR9Z5_WW2_af8VBPvzXmhhSFSFEvAY4c9GkS11EluEJMmDmQvX_XXvOoZW0/s1600/google+friend+connect+style3+netoops.jpg" /></a>
<.b:if>


.jpg)


