404 Error or Page Not Found Error generated by Blogger when a user enters an invalid URL or 404 Error is an HTTP status code that means the page you are trying to reach on your Blog couldn't found or Page not exist in the Server.
By Default Blogger shows Error page message in a box and its not look Style.
Here I am saying about how to Customize it much better...
Only Custom message [No Style]
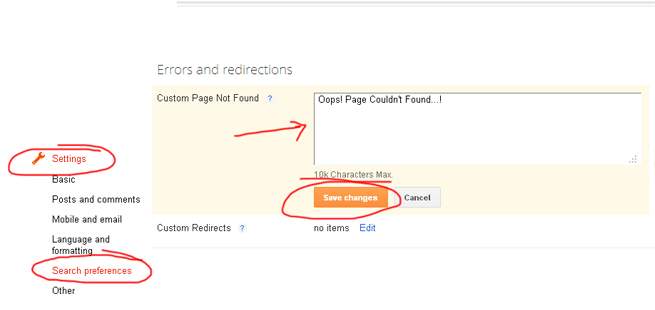
If you want to show only a custom message then First Go to
updated Blogger InterfaceThen Go to
Setting->Search Preferences Error Message with Stylish 404 images
If you want Colorful Stylish 404 page do the following.
- Go to Design->Edit HTML
- Find </head> and copy the below code just above it.
<b:if cond='data:blog.pageType == "error_page"'>
<style type="text/css">.status-msg-wrap{font-size:100%;margin:none;position:static;width:100%}.status-msg-border{display:none}.status-msg-body{padding:none;position:static;text-align:inherit;width:100%;z-index:auto}.status-msg-wrap a{padding:none;text-decoration:inherit}</style>
</b:if>
- Save the Template

Error Page Style 1
- Go to Setting->Search Preferences
- Copy below code in Custom Page Not Found section [as shown in fig. first]
<h2 style="font-size: 35px;margin: 0;text-align: center;">Oops..! </h2>
<h3 style="font-size:17px;">Sorry,You are trying to reach an invalid page...!<br><a href="/">Click here</a> to go to Homepage <br> Have a nice Day...</h3><img src="https://blogger.googleusercontent.com/img/b/R29vZ2xl/AVvXsEjCQWIbzK0D4lEb9g0j5tgNNVdpCD6n264clrfRGscH5AMMzEJwf5coJsQY6JNnHkMbyW2z4QL0qAtmG1Zl2frP0Bn6qcjZIFxLjGRyyZfArkbOksXrq8LWlzuLbDjT6ZyeQdDAqbaGalE/s1600/404+error+page+1.jpg"/>
Error Page Style 2

- Go to Setting->Search Preferences
- Copy below code in Custom Page Not Found section [as shown in fig. first]
<h2 style="font-size: 35px;margin: 0;text-align: center;">Oops..! </h2>
<h3 style="font-size:17px;">Sorry,You are trying to reach an invalid page...!<br><a href="/">Click here</a> to go to Homepage <br> Have a nice Day...</h3><img src="https://blogger.googleusercontent.com/img/b/R29vZ2xl/AVvXsEipv2XvCGiD_8QgLzl8Eg3LunWnQo8A1C_9qOt52eRiRQzQF2EHB1laVSbryoKBlcn48gDHrFQEfqN0WVrvPRpPqBzFbJS-WrJA5B4IISA2o0f4JBGb6al2CdOKL-cv8gJkM20DfhlEsJw/s1600/404+error+page+2.jpg"/>
Error Page Style 3

- Go to Setting->Search Preferences
- Copy below code in Custom Page Not Found section [as shown in fig. first]
<h2 style="font-size: 35px;margin: 0;text-align: center;">Oops..! </h2>
<h3 style="font-size:17px;">Sorry,You are trying to reach an invalid page...!<br><a href="/">Click here</a> to go to Homepage <br> Have a nice Day...</h3><img src="https://blogger.googleusercontent.com/img/b/R29vZ2xl/AVvXsEhZi1TFP1lz4VQQf0Iy-OI8jFvuL642VgHOHcsZNSR0B0RYPA5iggU8SONg6siZ8EnhXJR63Ge7e1lPY_lbkfU6Ovm6slnZizlMX-8j5G0gw5jHB8PvIEPXSlid2sstfgNzH0iCokZhKrE/s1600/404+error+page+4.jpg"/>
Error Page Style 4

- Go to Setting->Search Preferences
- Copy below code in Custom Page Not Found section [as shown in fig. first]
<h2 style="font-size: 35px;margin: 0;text-align: center;">Oops..! </h2>
<h3 style="font-size:17px;">Sorry,You are trying to reach an invalid page...!<br><a href="/">Click here</a> to go to Homepage <br> Have a nice Day...</h3><img src="https://blogger.googleusercontent.com/img/b/R29vZ2xl/AVvXsEiLVh-JPQoNbB-Xn98bQDeQy6R051p1zMYda_Nb5vX3hm-kkuFeA0Shq6MlAnN166-UZJr4cGc_veNQtxhZxGL80LtNen3rVneagAMxY99aZ80q7atooySscoRGRJL8p9w4A5RY3hDi05U/s320/404+error+page+6.jpg"/>
Error Page Style 5
- Go to Setting->Search Preferences
- Copy below code in Custom Page Not Found section [as shown in fig. first]
<h2 style="font-size: 35px;margin: 0;text-align: center;">Oops..! </h2>
<h3 style="font-size:17px;">Sorry,You are trying to reach an invalid page...!<br><a href="/">Click here</a> to go to Homepage <br> Have a nice Day...</h3><img src="https://blogger.googleusercontent.com/img/b/R29vZ2xl/AVvXsEiMZA8HFes24PdIwRXjrufF18d54QPyZsJr7BxAHos5v8_VsjLpSmerA3BnW3mWBi8knDU_s37-JTn2rG0Fs9jYP1_zAsy16GggxH6Aw5k2en-87QEDE40Y7PfjwHyiKyWRbpF4Byg80m0/s1600/404+error+page+7.jpg"/>
Error Page Style 6
- Go to Setting->Search Preferences
- Copy below code in Custom Page Not Found section [as shown in fig. first]
<h2 style="font-size: 35px;margin: 0;text-align: center;">Oops..! </h2>
<h3 style="font-size:17px;">Sorry,You are trying to reach an invalid page...!<br><a href="/">Click here</a> to go to Homepage <br> Have a nice Day...</h3><img src="https://blogger.googleusercontent.com/img/b/R29vZ2xl/AVvXsEjOIQKQeKwIkCRvSiJwz7kab6VoODHQjaa_J-V93H01qBr0z4MuNp_IsEylWr-VmMhcqQnpF6IV5I5IQGEbG4c2XVIAQEfqcl5eJK6qFDHRKRuOfK8w5vT8fFCm6h2OY-R4IGF6lx7rgvU/s1600/404+error+page+3.jpg"/>
Then Click Save..That all..
First thanks to Bloggerplugins.com for the custom error page code, visit
here. Then i made some changes and add beautiful 404 images that i was inspired from
HongKiat .
I thinks this article helped you..If any bugs of doubts don't hesitate to ask..do comment...
Like and share...


.jpg)

